Computer Vision
WEDNESDAY (08:30 – 12:00) + (16:30 – 21:00) 8 hours
At 8:30, Kevin and I(Marte) met Liv Marte in Dronesonen(Hossein was home because of illness). We were supposed to give a short presentation today, so I read through my old blog posts to remind myself of what I’ve done so far and where I’m still having trouble. Our presentation received some feedback on the computer vision section, where some people expressed concern that it might be too ambitious. That is a legitimate concern because there will be a significant amount of work involved, but I am extremely motivated and believe I will be able to complete it on time.
I looked into a few potential solutions for my Raspberry Pi booting issue after the presentation and found a few to test out when I got home.
Where is the hdmi signal?
When people couldn’t connect to a monitor, this was probably the most common issue they encountered. It seems the Raspberry PI isn’t very good at recognizing modern monitors, so we have to force it to turn on its HDMI output, even if it doesn’t recognize any connected displays.
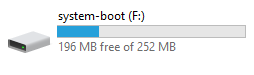
To determine whether this was the cause of my issue, I placed my SD card containing Ubuntu into my computer and opened one of the files to add one line of code to adjust the HDMI hotplug option.
I was looking for a file with the name config.txt. Once I did, I added the following code:
hdmi_force_hotplug = 1After saving the file, I took the SD card out of my computer and put it in the PI. I turned it on in the hopes of seeing the booting screen on my monitor, but unfortunately, nothing happened.
Possible Bootloader Corruption?
A bootloader is a program that loads the operating system. The bootloader for the Raspberry Pi is stored on an EEPROM, which is essentially just memory that remains when the gadget is turned off. That EEPROM can occasionally become corrupt for a variety of reasons and that would require reprogramming.
Since the Raspberry PI I received from USN had already been used, I didn’t know what had been done to it beforehand. Because of this, I wanted to make sure the bootloader wasn’t damaged.
Using the previously mentioned Raspberry Pi imager, I first downloaded the EEPROM Recovery image and flashed it to my SD card. (The EEPROM image can be found in the operating system dropdown menu under the use custom option.)
I slipped the SD card into the PI and powered it on. The outcome I wanted was for my monitor to display a green screen, and the green LED on the Raspberry Pi to blink in a consistent pattern. The green LED was on but not blinking, indicating failure.
This will turn out to be a recurring theme.
Although I had concluded that the fact that the green LED wasn’t blinking indicated that the PI was dead, I wanted to rule out any other options just in case. So the next two options I wanted to try was booting thrugh a USB stick and an Ethernet cable.
I followed this guide for recovering the Bootloader Firmware
Trying two different ways of booting the pi
This is the last of the potential solutions that I will test out. SD card is the default method of booting a device, however experimenting with other methods won’t hurt. If you go all the way down to the bottom of the Raspberry PI imager, you will find a section labeled “Misc utility images” that gives you the opportunity to select one of several options for booting the PI.
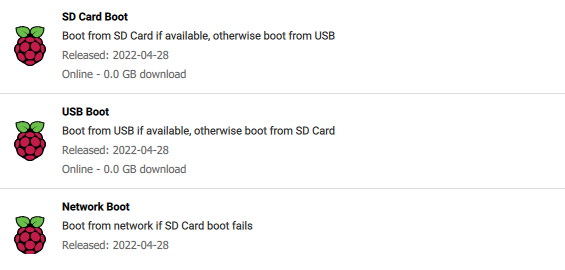
USB Stick
I altered the configuration to boot from USB and installed the Ubuntu’s operating system on a USB stick. I turned it on and waited for the green LED to blink, but it remained steady as before. Unfortunately, I was also unsuccessful with this strategy.
Ethernet Cable
After the USB attempt failed, I updated the settings to boot from the network. I connected an Ethernet cable and powered it up, but nothing happened. The green LED was still simply glowing; I saw someone refer to this as “The green light of death,” which was an appropriate description.
Fried Board?
Unfortunately, I think I have to come to the conclusion that the PI is dead and probably has been dead from the beginning, since I have never seen the green LED blink even once. The only bright side to this experience is that I do believe I have gained a significant amount of knowledge as a result of it.
I’ve now given it to Joakim in the hopes that he can make it function, else I’ll have to find a new one.
In troubleshooting the Raspberry PI 4 B, I found these links to be extremely helpful.
https://forums.raspberrypi.com/viewtopic.php?p=437084#p437084
Hours on the project this week: 8
Because I have two exams next week, I haven’t made as much progress on this project as I had hoped. I’ll try to catch up next weekend once I’m finished.
Marte Marheim, Computer Science
Mechanical Engineering
On Sunday I wanted to make some changes on the design for the arm, and spent a couple hours working on the designs. But I have had some trouble lately with low memory on my computer, so the whole work session was somewhat difficult because of several warnings and error messages that continued to pop up. After some trial and error, I ended up buying a new computer and have had to take the time to set up my new computer.
On Wednesday I met with Marte and Kevin in dronesonen. We gave a presentation on where we were in our project, if we have faced any problems and what we are planning on working with in the upcoming weeks.
After the presentation was done, I had an arrangement with Kim from group one. He was going to help me with the laser cutting machine, since it has been over two years since I last used the machine. This ended up taking most of our time for the rest of the day, but we managed to make all the parts for the chess board. The only thing that remains to be done is to laser engrave the tiles on the chess board. Kim will also be helping me with this, in about two weeks’ time.
Next week is the fall break, so I will be home with my daughter and will not be able to work as much on the project as I have done previously.
I am also currently waiting on some parts for the servomotors, which will arrive around the 15 of October. I have bought an electromagnetic magnet for the robotic arm, which came in the mail this week. I can`t complete the arm design before I have all the parts, so my plan is to start working on the turn table while I wait for the parts to arrive. I have offered to make a prototype to Kevin and Hossein, so that they can begin with the coding of the arm, but they told me that it was not necessary.
Workhours this week: 10.5 Hours.
I tried to upload an image of the chess board, but could not upload due to the image having a to large file for this blog. Will try to upload a new image when the chess board is laser engraved.
Liv Marte Olsen – Mechanical engineering.
We have looked at OpenCV and tried to make the camera detect shapes and contours and seeing how that works. We need more work and testing on this part, to see how well it works with our chess pieces. And we have researched some more on the electrical components about 3 hours(sunday), and we picked up where we last on the planning of the programming of the robotic arm.
5 hours was spent on researching more on OpenCV(wednesday).
Hossein Sadeghi & Kevin Johansen, computer engineers.
One response to “Group 2 – Week 6”
[…] Week 6 Troubleshooting […]