We decided to post both week 39 and 40 because of the server issues in week 39.
Daniel:
Week 40:
Last week I completed a scene that can be used as an environment for the interaction we will have to implement. This week I made a simple UI menu for the Unity Application:
https://i.gyazo.com/54fdb30a54109ff212006bf0180fb23f.mp4
The menu has 3 options: “Play”, “Information” and “Quit”. Where the “Play” button will take the player into the scene I did last week. The “Information” button will display some simple information. Lastly, the “Quit” button will simply quit the application. Even though the menu doesn’t have that much features as of yet, one could always add these in the future if needed.
For next week, I will start the development of an interaction that can be implemented into the scene. Possibly also do some research on some of the issues I found in the previous weeks. All while waiting on the gloves to be completed, so that I can start with the interface between Arduino and Unity; Something I already tinkered with in week 38.
Week 39:
After having connected the Arduino and Unity application together in week 38. I figured I could start on the creation of a scene (terrain, models, objects, etc.) within Unity. In this case, removing the scene I did in week 37 so that I could start on something fresh. Where I decided to use free low poly packs from the Unity store, combining this and this pack. Which ultimately gave the terrain a decent look:
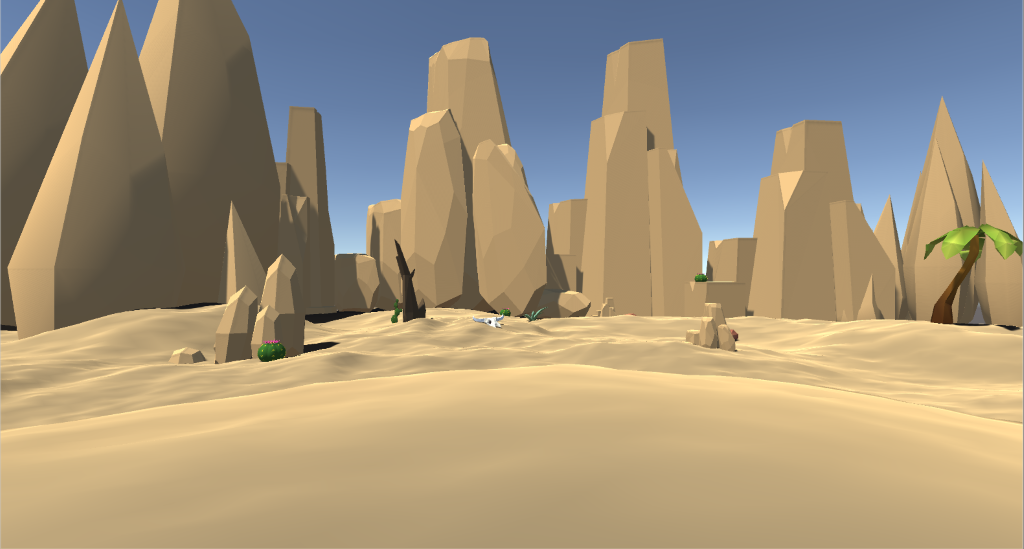
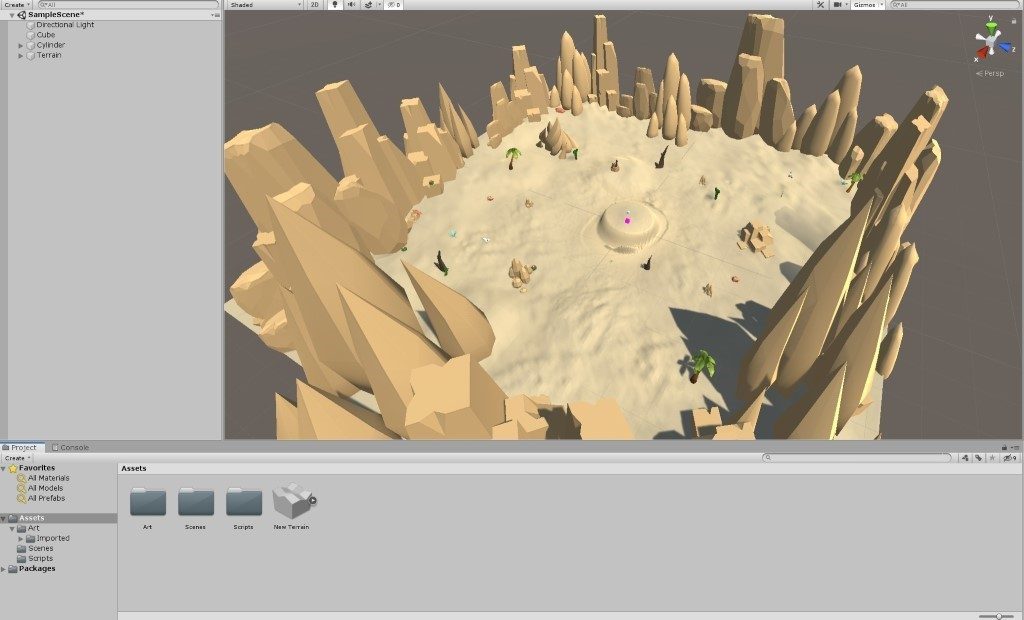
This scene will be able to serve as the environment for where we can implement the interaction. E.g. by having the interaction in the middle (where the pink cube is located). Furthermore, I will also add a soundtrack to this scene. Something that can be looped in the background.
In addition to this, I have started the development of an UI menu that can be implemented into the Unity application as a main menu.
Petter:
Previously I was using mostly Unitys predefined components to create the physics and movements of the cube. Now this works all right, but because we are using a virtual interface, our control of the cube, or the lack off, makes it very difficult to make the cube return to a cube after turning.
We could introduce stabilization of the xyz axises if the cubes are not aligned to 0, 90, 180 and so on, but this returns us to the previous problem, calibration, even if this does work, it would not be optimal, sometimes you want to hold the cube 45 degrees in the air to see three sides right? There are of course ways to achieve this as well, but what I’m learning as I’m trying out different solutions is that all these problems are caused because I jumped straight into full fledged joint based physics, which as I’m also learning seems to create more problems than it’s worth right now. So, I went back to the basics to ensure our cube functions like it should, coding it from the ground up. It’s going well but there are many options to consider.
https://gyazo.com/362b77ac3c6b5eb9dc4074f75381265d
Here’s a small prototype with some basic movement. I’m expecting to have it done by end of next week.
Even:
Finalized the project description and made a short project plan. Prepared to make a plan together with the group in week 41.
Project Description
To make this project a success we must be able to create a glove that can give the user feedback when “touching” something in virtual space. To be able to do this we have to make a scene in unity where the user will be able to solve a rubix cube and do other simulations. The gloves will be made of a fabric where vibrating motors attached at the fingertips will replicate the sensation of touch. The glove will be controlled using an Arduino, and the virtual space will be displayed by using a HTC VIVE headset.
Project plan
Finalize the concept.
Make a proof of concept for the gloves
Create the scene where different simulations can be run.
Create a UI where the user can choose between different simulations, pause the simulations. And go back to main menu.
Create a proof of concept simulation where the gloves can be tested out.
Create the Rubix cube simulation
Herman and Tom Erik:
Herman and I arrived at which technologies we wanted to try implementing for the alpha. We arrived at vibration motors for haptic feedback. We’ll also attempt to use IMU’s and strain gauges in the form of flex sensors, to provide further accuracy to support the camera tracking or swap it out altogether.
Further time was spent researching components to be used for said use cases. Once desirable components were found, we ordered them, in order to hopefully have a working proof of concept soon. One, IMU, and flex sensor were ordered in order to experiment with their uses and verify our theories regarding their use in the project.
An IMU is a combined accelerometer and gyro. The idea behind using IMUs in the gloves are for more precise movement, and rotational tracking.
The flex sensors are variable resistors, which vary in resistance based on how much it’s bent, the idea is to apply these for precise calibration of how much each finger is bent.
Parts ordered:
Vibration motor:
Mini Vibration motor
Datasheet: https://www.elfadistrelec.no/Web/Downloads/_t/ds/316040001_eng_tds.pdf
IMU:
ICM-20948 9DoF IMU
Datasheet: TDK invenSense ICM-20948, 06/02/17, revision 1,3
Flex sensor:
Seon-10264
Datasheet: Spectrasymbol flex Seonsor FS
Initial plans were also to sketch some schematics, however that is delayed due to software issues.
As well as the sensors of the glove we have looked at how to control, read and transfer data in the glove. Here we have looked into the option of using a microcontroller with BLE transmission or through WLAN, where we create an IoT network with both gloves and the computer. We are looking at basing the communication on RS-232 for prototyping and to test proof of concept purposes for then to go over to a MQTT or another communication platform more optimized for IoT systems.
William:
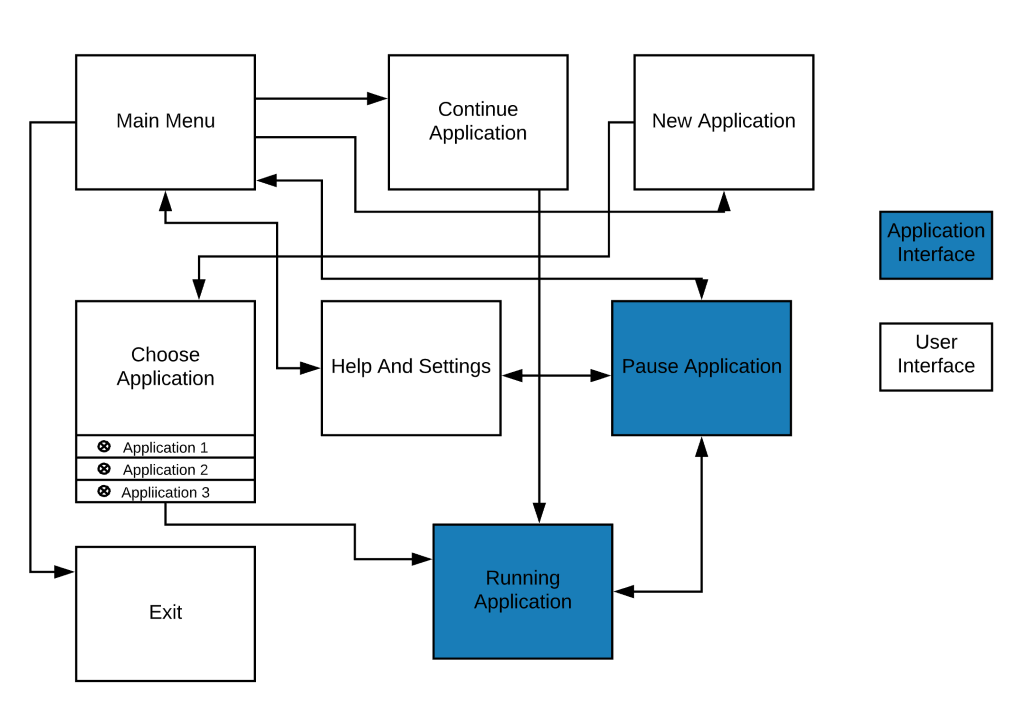
Made a Flow Chart diagram explaining how I want the User Interface to be implemented.