This week, we made significant strides toward getting our prototype ready for testing. Our data engineers successfully integrated the electrical components with the coding, ensuring the system works seamlessly together. Meanwhile, the mechanical engineers have completed the design of the elevator parts, preparing them for 3D printing. These advancements bring us closer to assembling and testing the full prototype.
Kim:
Troubleshooting and Code Updates
This week, I continued working on the parking system project, specifically trying to get the motor to rotate correctly. I initially struggled to make the motor move with the code. Despite rewriting parts of the code, the motor still wasn’t responding properly. After some investigation, my teacher and I decided to manually test the motor, and I was finally able to get it to rotate manually.
Through this process, I learned that the PULS connection on the microstep driver needs a PWM (Pulse Width Modulation) signal, rather than a simple HIGH/LOW signal. PWM sends pulses at a steady rate, which the motor requires to move smoothly. This was a key realization for me, and it meant I had to rewrite sections of the code again to use analogWrite() for generating the PWM signal.
Now, I’ve updated the code with the correct signal structure, and my next step is to test all three motors to see if they will rotate properly using the code. I’m hoping that the changes I’ve made will finally allow the motors to work as expected.
This experience taught me a lot about how important it is to understand each component’s specific needs and how hardware and software need to work together seamlessly. I’m looking forward to seeing how the updated system performs in the upcoming tests.
Benjamin:
This week, I began researching how to build an efficient website for our smart parking system, Vertical Smart Park-or VSP in short. Our system employs an elevator that lifts the cars onto a “shelf” to maximize space efficiency with increased safety, therefore quite different from the conventional parking structures. To make sure our website communicates the VSP benefits clearly and follows industry standards, I spent considerable time exploring several examples and extracting the key features and structure that will be of important to our site.
My main research objective has been to get an insight into how competing companies in the field of smart parking portray their services in structure, design, and content. This would give us a feel for what is standard within the industry, what features are expected by users, and how to showcase the innovative aspects of our system.
Above all, I need the website not only to communicate the technical capability of our system but also to delight the users through an effortless experience. Thus, usability, aesthetic appearance, and clarity of content became essential points of concentration. I will build the site in Visual Studio Code and possibly integrate our app.
Insights were obtained by studying how websites belonging to the same industry segment communicate parking solutions. Some related examples that I looked at include:
Clear homepage: One thing every website I looked at had in common was the call for a clear and engaging homepage. Websites used images, videos, and infographics as a means of quickly communicating system benefits. For example, we’ll have to make sure that our home page in VSP provides strong visuals regarding an elevator mechanism in action, with a small summary overview of the system benefits.
How It Works Section: The “How It Works” section was educative on how Dpark’s solution works in a very simplified manner. For VSP, the same section will be important to explain how the elevator system works. I can imagine the usage of diagrams or animations that show how cars get lifted onto the shelves and how this process increases parking efficiency.
Contact and Support: Another common element that I have noticed is how easy it was to find the contact information. Each site has made it easy for the user to contact the company via email, over the phone, or through a contact form. I will make sure that VSP’s contact information is easy to find, as well as a section for support where users can find the answers to common questions.
Pricing Information: Most of the sites I researched had very clear pricing structures or at least an easy way to request a quote. This is an area in which we will want to add a pricing section or at least a “Get a Quote” section. This will give transparency to prospects interested in the company and help drive the sales team’s engagement with new customers.
With these insights in mind, I will now build a website for VSP using Visual Studio Code. First, I will create the structure of the layout that will include all the key elements identified: an attractive homepage, a how it works section, and contact information easy to access.
Jørn-Erik:
Indvidual blog for the course develop of smart system (Jørn Erik Minh Le)
Week 5
So, I just found out yesterday that I was supposed to do an Individual blog every week where we document every step we do. To my defense, I thought we just had to blog every week as a group.
As far as we had come to the project, we had problems with deciding and finding out what we were supposed to do when it comes to the project. Because our team consists of five computer science students, it was a challenge to balance the amount of work to start with. As creative as I could be, I wanted to try to make an app for our project.
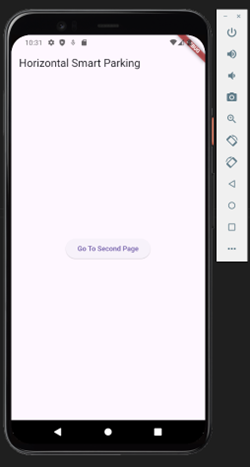
The first weeks, it became clear that this could be a huge opportunity for me to do a big project for myself. I started researching our smart parking project and I wanted to see what I can contribute as a member. It turned out that I had to go to the BIOS and change something in there for the software to work, and I took about an hour of googling before I found out. Downloading the software was a problem, and making it connect to another software where we could use a simulator was also a big problem. I turned out I had to go to the Bios and change something in there in order for the software to work, and i took about an hour of googling before I found out. As week 5 I started slowly but there is a lot to take in. I started to make some examples, which I will be providing some pictures of below. I was also looking into other apps like Easypark and tried to make some simplified versions just to be optimistic.
Right now, as it stands, I have started slowly, making an interaction button where we can go back and forth through two slides.

Milani:
Designing User Flow
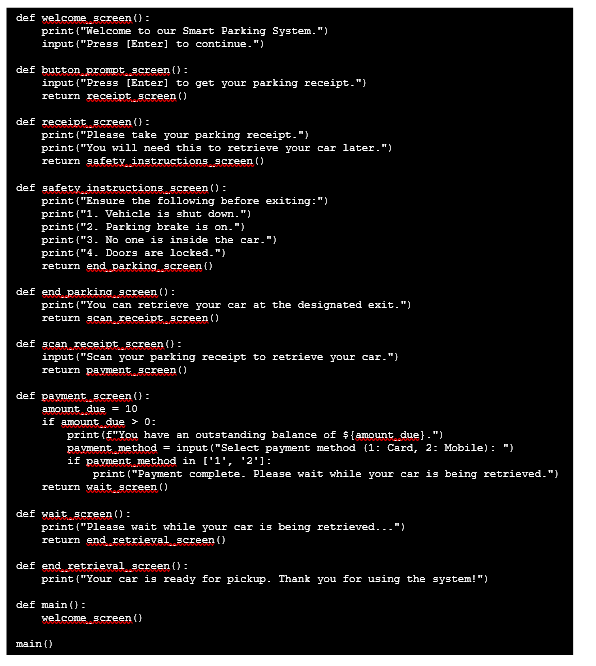
I designed the flow of a smart parking system using an UML activity diagram to assure smoothness. The flow consists of:
Phase 1: Welcome and Parking
1. Welcome Screen: “Welcome to our Smart Parking System.”
2. Button Prompt Screen: “Press [Button] for your parking receipt.”
3. Receipt Screen: “Please take your parking receipt.”
4. Safety Instructions Screen: “Secure the vehicle.
5. End Screen: “You can collect your car at the exit marked.
Phase 2: Recovery of Car
1. Receipt Scan Screen: “Scan your parking receipt to retrieve your car.”
2. Payment Screen: “You have pending amount. Please pay now.”
3. Wait Screen: “Please wait while your car is retrieved.”
4. End Screen: “Your car is ready for pickup”
Button Code
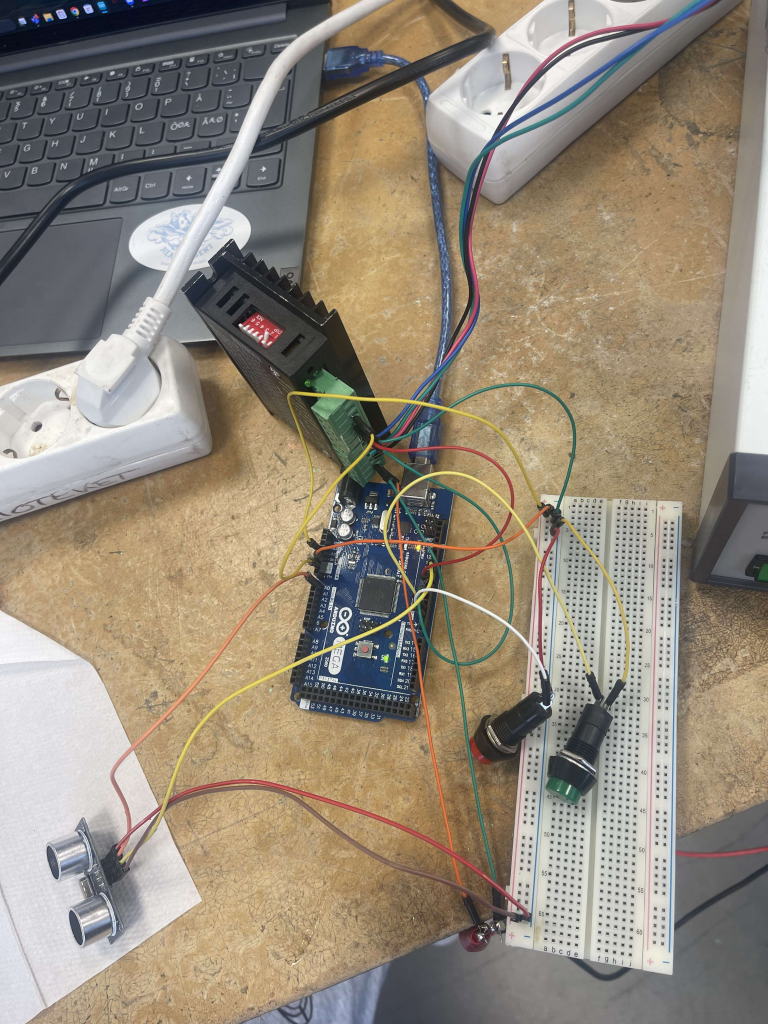
This week, I worked on writing the code for the park and retrieve buttons for our parking system. These buttons will allow users to park their car and retrieve it with a simple press. I set up the park button so that when it is pressed, the elevator will take the car to an available spot. The retrieve button will bring the car back to the user when pressed. Even though I wrote the code, I haven’t been able to fully test it yet since the components like the motors and sensors aren’t connected. Once everything is put together, I’ll test if the buttons work as planned and if the motors respond correctly.
What I Did This Week:
• Wrote code for the park and retrieve buttons.
• Prepared to test the button functionality once all components are connected.
Next, I’ll focus on testing the buttons with the full system when everything is ready!
Azi:
Project Overview
The following project implements the Integrated Smart Parking System, which deals with user interaction through integrated sensor technology. When arriving, the main screen displays the user and guides them through the process for parking and retrieval by scanning the receipt.
These parking sensors are integrated with the Arduino microcontroller, which interfaces directly with a laptop-based SQLite database. Arduino monitors the parking sensors continuously in real time for the occupancy data, safely sending the updates to the database for effective monitoring of parking availability.
Setting Up SQLite Database
SQLite aims to design and store the database right on the laptop for information storage and management of parking spaces. The four main tables include:
• Parking_spot: It provides information about the occupancy status of each parking spot or a specified operating condition of a parking spot.
• Parking_sensors: This provides data about sensors that are to be deployed for monitoring parking spots.
• Parking_receipts: This table records the entry time and exit time of the vehicles.
• Payment: The parking system will record the payment information.
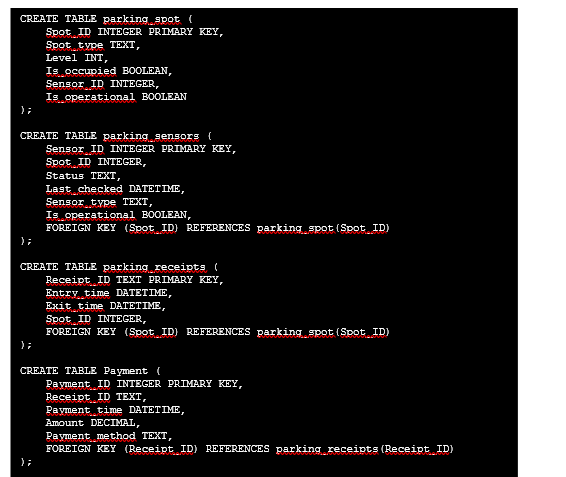
This is to make sure that we store parking spots, sensors, and receipts in ordered fashion. We tested this – the creation of these tables was done by running the simple “.tables” SQLite command.
2. Parking Spot Monitoring with Arduino Setup
The Arduino monitors parking sensors for occupancy of the space by a car. There is a sensor attached to an Arduino board, transferring the data to the laptop via a serial USB cable.
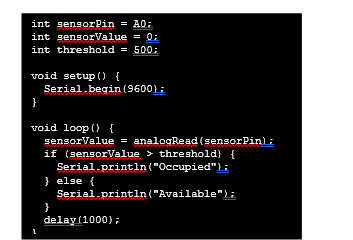
This code here makes sure the Arduino continuously reads the sensors and sends “Occupied” or “Available” to the laptop through Serial communication.
3. Python Script for Handling and Updating Data on SQLite
With it, this Python script was used on the laptop to bridge the Arduino and the SQLite database. Every time it receives data from an Arduino, through serial communication, it updates the parking_spot table in the SQLite database about the status of whether a spot is free or occupied.
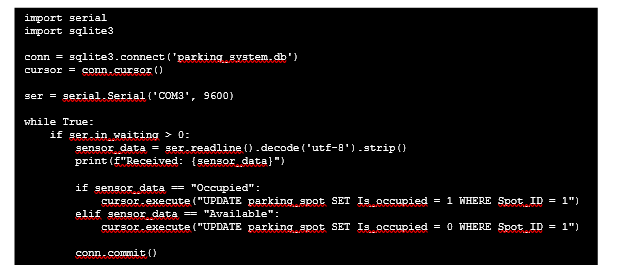
The Python script running at the backend, initiates a serial connection with Arduino, listens to the occupancy data continuously, and in case of occupancy or availability updates the field Is_occupied in the SQLite database.
4. Writing Code for User Flow
Following the design of the user flow, each stage of the flow maps to a function responsible for handling of the user interacting with it in Python. This code will take the user through parking and retrieving:
5. System Testing
The next steps for this project will include:
• Integrate user flow with an already available Arduino-SQLite system.
• Enhance the Python script to connect back to an SQLite database where data of users, receipts, and payments will be stored.
• Running all tests from the end to ensure that the system performs as expected right from parking until retrieval.
The focus of attention in this phase is primarily on:
• Testing of the flow with occupied and available spots to make sure there is interaction of user flow with sensor data.
• Make sure there are real-time updates of occupancy status by querying the SQLite database for the parking_spots table.
• Functional testing can be done by simulating different scenarios with a number of parking spots and sensors.
• Any bugs or issues identified during testing need to be fixed.
Shanel:
This week, as team leader, I focused on organizing meetings and making sure everyone is on track with their tasks. I checked in with the team regularly to help solve any issues they faced. In preparation for our upcoming presentation, I worked on putting together the key points to ensure we clearly explain our progress. I also assigned new tasks for the team based on our next steps, making sure each person’s strengths are used, especially in connecting our data engineers and mechanical engineers.
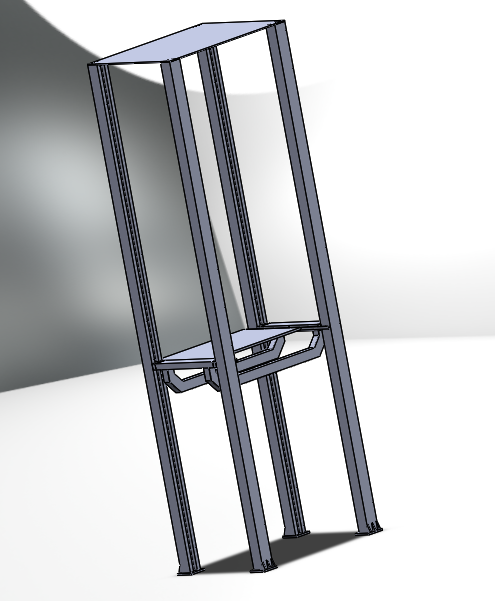
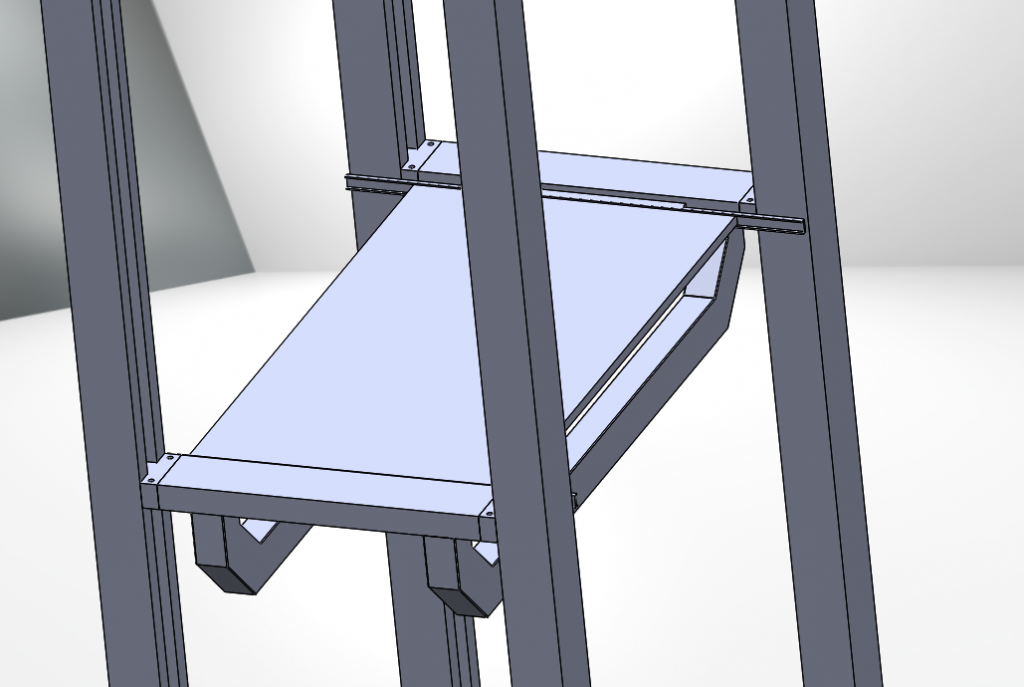
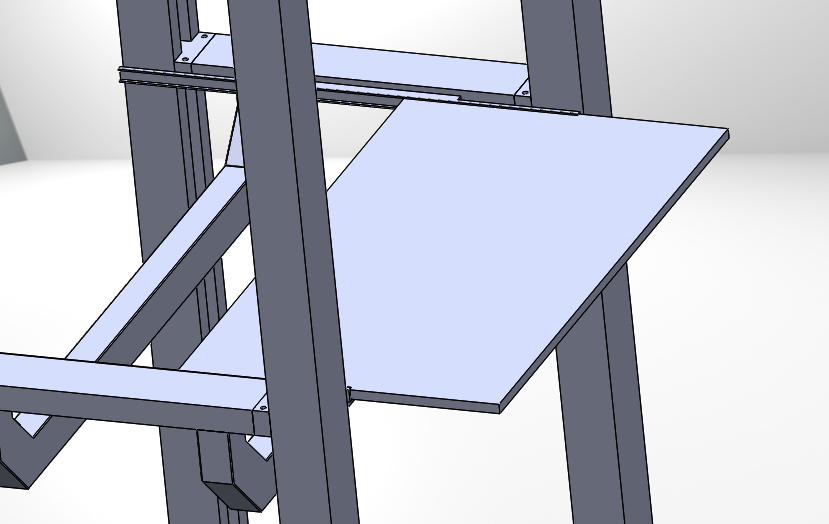
On the technical side, I’ve been working on designing the elevator system for our smart parking system. We ran into an issue with the parts needed to move the elevator vertically, so I’ve been reworking the design to find better components. The goal is to ensure the elevator can move smoothly up and down without problems.
I’ve started sketching the V-Wheel system, which will help the elevator move vertical and horizontal. Next step is to 3D printed the necessary parts for vertical movement and test it to the prototype. If they work as expected, we will include them in the final design.
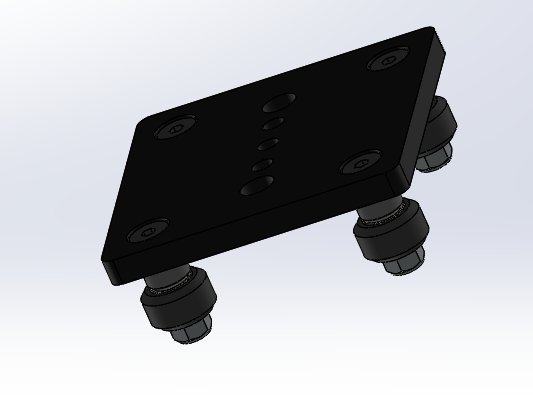
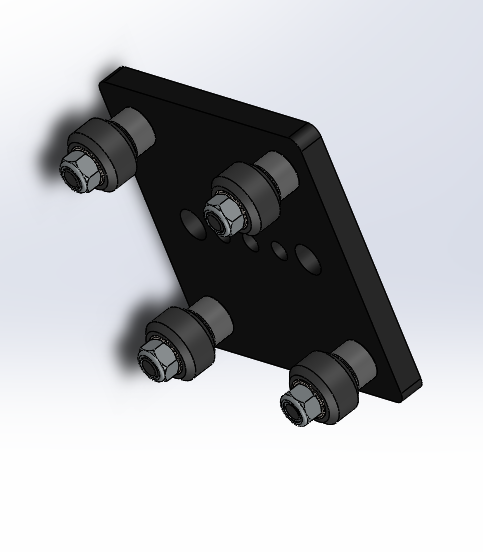
Right now, I’m focusing on how to make the horizontal movement work in our physical prototype. While the design looks good on paper, applying it to a real model has some challenges, like dealing with friction and making sure everything stays aligned. I’m looking into different materials and mechanical solutions that can help solve these issues without adding too much cost.
Additionally, I’ve started building the structure around the elevator model to help us better visualize how it will work in the parking system. This includes thinking about how the elevator will interact with sensors, control systems, and other mechanical parts. By the end of the week, I aim to have a more complete prototype that includes both vertical and horizontal movement and a better idea of how the elevator fits into the overall system.
Overall, this week has been productive. We’re making good progress as a team and working through challenges as they come up, keeping us on track toward our project goals.
Meron:
This week, I focused on researching the architecture of our parking structure, aiming to determine the most stable design while ensuring seamless integration with the elevator system. I explored various construction methods and materials that would provide durability and support for the vertical movement of vehicles. Additionally, I examined the layout to optimize space utilization, ensuring that the system operates efficiently while maintaining safety standards. This research will help guide the next steps in finalizing the design and beginning the implementation phase.
Furthermore, I began designing the parking levels and the building as a whole in SolidWorks. This step marks the beginning of visualizing the entire structure and how the components fit together.