Sondre – Week 4
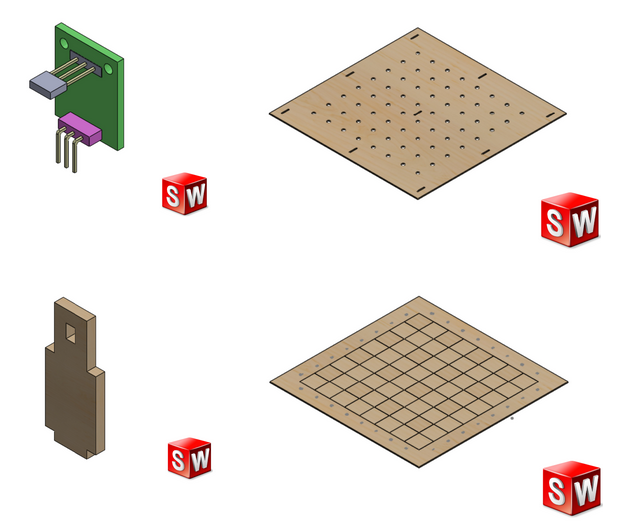
Continued to work on CAD of the chessboard and the support plate with mountings and sensor placeholders. Worked on the mounting and support pins between the support board and the pcb(ky003) holder board.
Also designed the KY003 hall magnetic sensor module in solidworks to visualize them and see in the assembly where they need to be installed.
Plans for next week will be to laser cut and engrave the chessboard with belonging parts and assemble them to check for fit or needed iterations.

Ulrik – Week 4
This week’s goal was getting together some of the materials and starting production of the gantry-system of the crane. The feet of the ground-part has been laser cut and is ready for mounting on the railings when they are cut on Monday. I have not been able to acquire stepper-motors for the robot’s positioning, but I reckon I will have them in my hands soon and can continue the process of fitting them to the gantry-legs. Usn has also supplied me with slide-bearings for the ground beam trolley. Now that I have some of the shelf-parts I can start designing the fitment of them into the original design.
Plan for next week is mounting the feet to the gantry-system and start the cadding of the girder and legs. If I am able to get my hands on the metal rails on USN, I can fit them to the lower-gantry-system.
Kristian – Week 4
This week consisted primarily of research on some different topics. I tried to make stockfish work with c++ but a couple of hours in, i decided to use my time researching instead. I have briefly looked into how to use python and arduino (definitely possible, but need more time on this). I have also looked into stepper motors and how to control these. We need at least 3 motors. 1 for x axis,1 for y axis and the last for z axis. we might need one extra for the x axis but we will find out this later. I have planned to acquire motors next week. The arduino ide has a downloadable library called accelstepper which makes it possible to control motors and make them move simultaneously.
The stepper motors cannot be directly connected to an arduino and this is solved with drivers. The driver creates precise positioning. As I mentioned earlier I have planned to acquire the motors next week, and find out what driver it needs, and then hopefully acquire them as well. 😀
Jon-Eirik – Week 4
This week I didn’t get to do as much as I hoped. I had some sickness from the weekend still hanging over me. What I got to do this week was making a github repo for all of us computer engineers to use going forward. I’ve also looked at some magnets that would work better then the ones we have, so now I’m looking forward to testing those. Another plan is to use the small magnets we have but more of them per piece to make the magnet field bigger.
For the upcoming week my plan is to look some more into Arduino coding with the motor or sensors together with the others. We need to make our system able to detect and read up to 64 sensors, so we need to see if the best choice is using 8 arduino mega or if there is another way.
Emil – Week 4
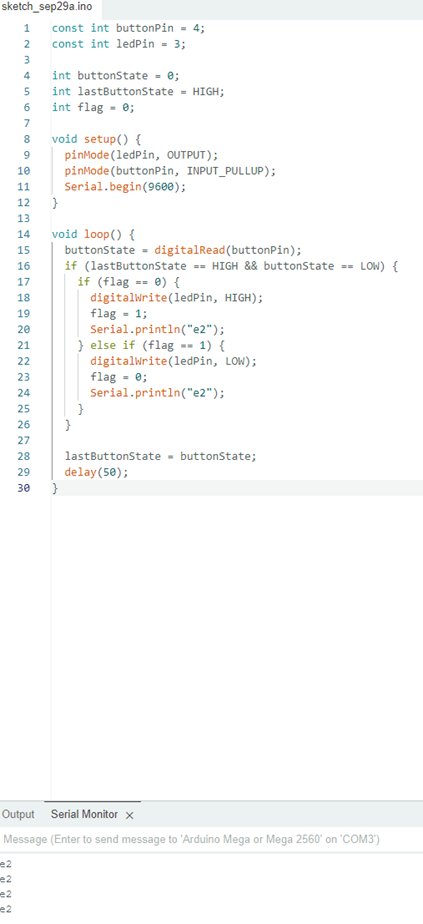
For this week I wanted to test the concept of the coding of the sensors. I decided to pull up my Arduino kit and test with a simple button. The testing should be like this. I want a button that I press consistently that should simulate a piece standing on top of it. When the button is released, it should send out the square it is on in the console, which in this test is E2.
Since It’s been a long time since I’ve done something like this, I had to look for some help. I found a site that explained how to code the simple button press and tweaked this code to make it send out a message when the button was released. (https://www.instructables.com/How-to-use-a-Push-Button-Arduino-Tutorial/)
I copied the code and tested if it worked. It worked fine.
Then i made some changes to make it light up everytime its realesed and print out the square it was on which was E2. I added a state to make the light be lit at the start. Also had to inlcude serial.begin(9600) to be able to use the serial montior. Then i did some changes in the loop so that the ligth only reacts on button release and so that it prints out E2.
