Hi Dronesonen! 😊
This week marks the beginning of individual blog contributions, but before we delve into that, we will provide a quick recap of the group work we conducted on the following dates:
Monday – 28.08.2023 (09:15 – 14:00):
- Our members of the mechanical & electrical discipline participated in Steven’s GitHub lecture and picked up the necessary starter kit to begin the MVP (Minimum Viable Product) building process.
- Our members of the software discipline conducted further research.
Tuesday – 29.08.2023 (09:00 – 14:30):
- We revisited and reworked our ABC – requirements to better fit the NASA guidelines. The modified requirements can be seen in Diagram 1.
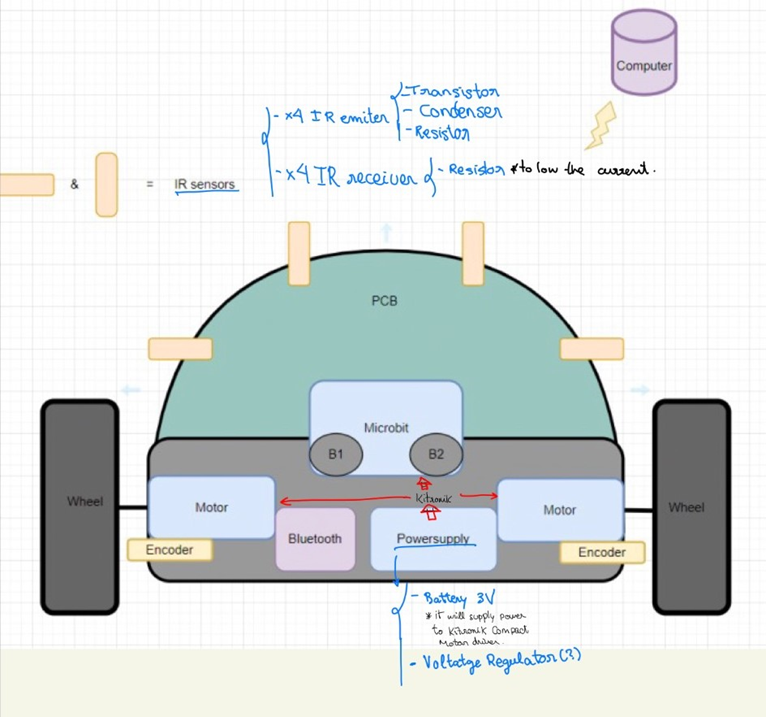
- We discussed the mechanical and electrical structures of the micromouse and created an initial high–level component- and system design overview diagram to illustrate the placement of each component and how they could be connected. These designs do not represent our final visualizations but were created for us to communicate more efficiently across disciplines and lay the groundwork for further design and research. The high–level component diagram (Diagram 2) and system design overview (Diagram 3) can be seen below.
Diagram 1:
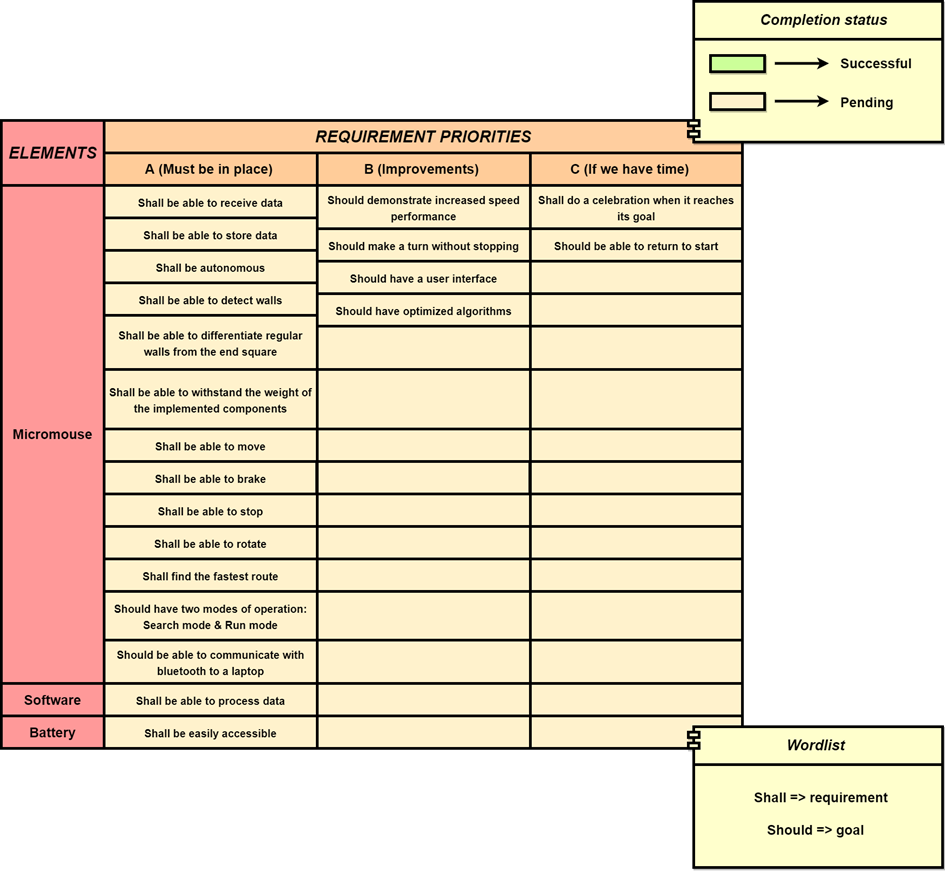
Diagram 2:
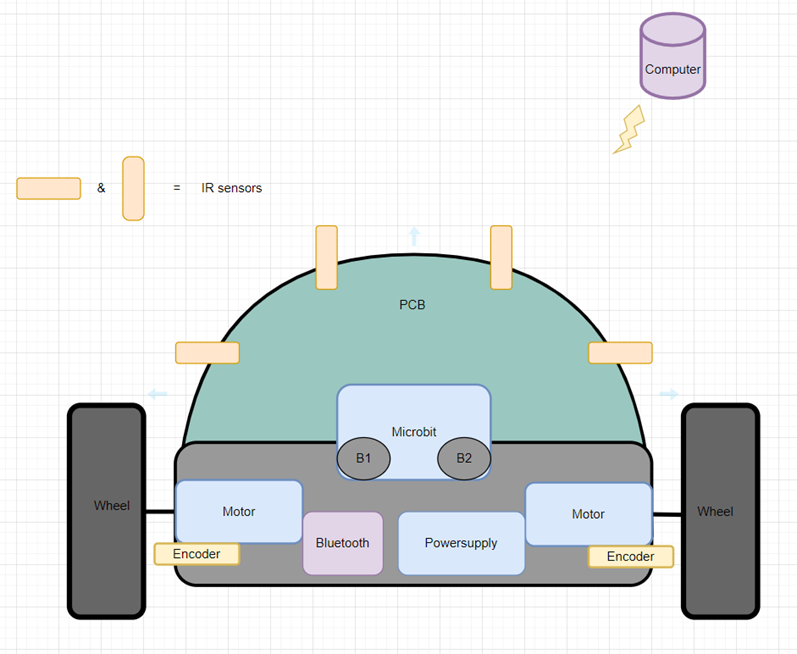
Diagram 3:

Individual contributions:
Erik-Andre Hegna – Software:
When the group was meeting on Monday I was stuck in Asker because the train which was supposed to get me to Kongsberg had some rail problems because of the rain. I instead connected to the rest of the group meeting through discord when I got home. The group wanted to join the lecture, so I started drawing a simple visualization of the micromouse and its components in drawIO.
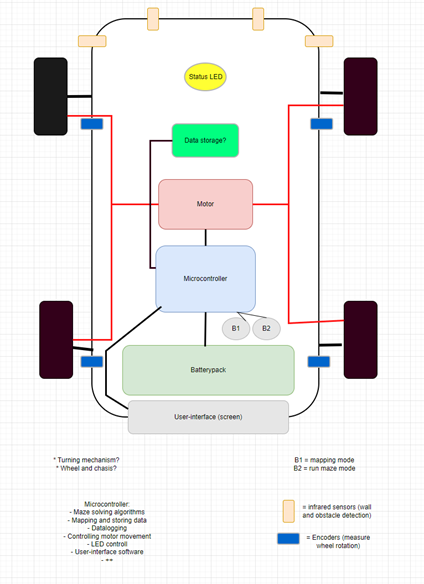
Besides discussing the ABC requirements on Tuesday, we got into a long discussion about the different components that’s implemented and how they work, the physics which influence the micromouse, and the physical structure of the mouse and how steering is going to work. I made two simple sketches about the component overview and high-level system design in drawIO based on what we discussed and some input from ChatGPT. I did not manage to do much work this week outside our regular meetings because of the “game design course”, which was pretty intense.
Lars Leganger – Software:
This week I met up with the group and we continued our work with the micro mouse. Together we revisited our system requirements and discussed our system overview. My assignment for the week was to test out different programming environments. The environments I looked at were Makecode by Microsoft and visual studio code. We use the Microbit v2 and there are two environments I am looking at. I also did further research on the micro mouse and looked at different maze solving algorithms for the software.
Ask Lindbråten – Software:
- Created the reworked ABC – requirement diagram using draw.io.
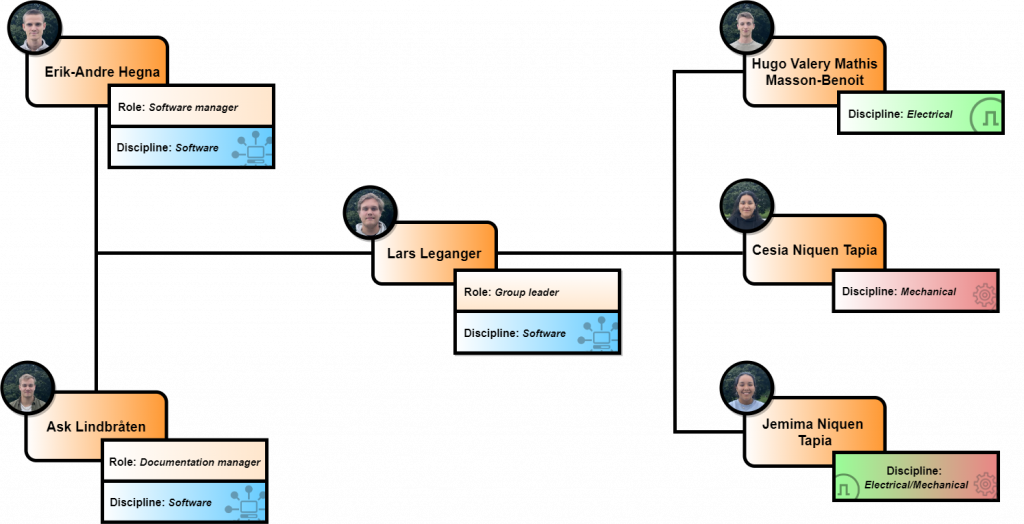
- Created an organization chart (Diagram 4) to showcase each team member’s discipline and role using draw.io.
- Initiated the Git repository to track and manage our project development within our group.
- Watched the “Anatomy of a Micromouse” lecture to gain a deeper understanding of the system as whole.
- Watched the “Micromouse Software Structure” lecture to learn about how to, for instance:
- Keep track of walls using states.
- Improve the starting position.
- Turn in place and in a curve.
- Move to cell centre.
- Conduct potential crash detection.
- I have also been assigned the role of documentation manager and will be responsible for structuring and posting weekly blogs from now on.
Diagram 4:
Cesia Niquen Tapia – Mechanical:
This week I’ve been doing research about, in general, the operation of the micromouse. I wanted to see different examples of the different prototypes. In the videos that the teacher posted we can see that the most used design is the balanced one with big wheels. As all the heavy components are in the middle of the wheels and extended up, balance doesn’t seem to be a problem.
Nonetheless there are also other kind of easy structures and as we want to do a first testing we don’t know for sure the dimensions of the components we will use. So in one of the team meetings, we set an initial idea to place the wheels in the back and create a kind of multidirectional wheel based on a sphere, which is only guided by the rear drive wheels.
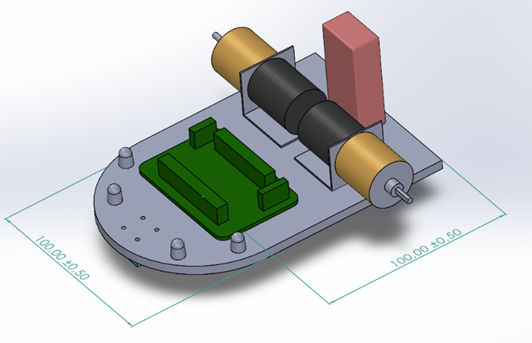
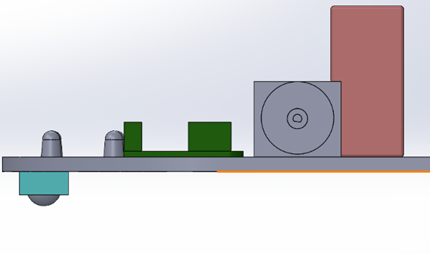
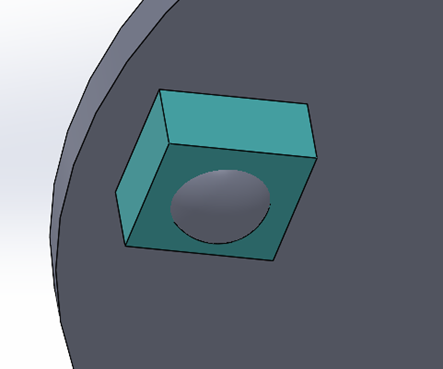
Thinking about the dimensions of the maze, the maneuvers that our device will have to do, and the space occupied by the components, initially the correct dimensions could be 15×10 cm. There was also a discussion about the wheels. About if it’s better to ask for them in the dimensions we need or maybe design and manufacture it ourselves (for our first try). So, at the moment we just made a design without them although most likely, we will order them with the dimensions we need, since designing wheels can be complex. Below you can see the design of the 3D model with real measurements of the components.
Jemima Niquen Tapia – Mechanical/Electrical:
This week we have been rewriting the requirements and talking about how we want the micromouse work and also its appearance. As we have a high-level design, I have started looking for the components we will need in each part with the help of the videos that the teacher has posted. Also, I have been checking the Kitronik compact motor driver, how to use it and the power we must use, so trying to figure out how to power the entire mouse with the different powers required. At the moment it looks like supplying the Kitronik can give power to the rest of the things. Also seeing how to place the different components and how this could change as the project progresses.
Hugo Valery Mathis Masson-Benoit – Electrical:
This week was mainly about setting up the last part of the project infrastructure. We’ve reworked all the ABC requirements done last week, (at least reformulating them), and put in place what’s going to be needed for each part (data, mechanical, and electrical). After this was done, we’ve realized the component overview of our system, to give us a good representation of what the mouse could look like. This way we have an idea of where the wheels should be placed, same for the sensors, the battery etc.
This week also aimed to explore the specifications of the hardware/software. I’ve watched all the lecture videos sent by our teacher about the anatomy of the Micromouse and the requirements of the main components. Those information and indications helped me visualize what’s going to be needed for the prototype I will start to realize next week. The objective is to test each important part on the breadboard, then connecting all together with the right power source to test if everything is electronically viable.
This concludes our blog post for week 2, see you next Sunday!😊
Best regards
Group 4