There has been a rough few weeks for the Holobot team. Overwhelming amounts of school has made putting in solid working hours hard, but after a few meetings and planning we are back on track. We have ambition to have a mechanical working prototype done by Monday 2. October.
Log Kjartan Hololens 2
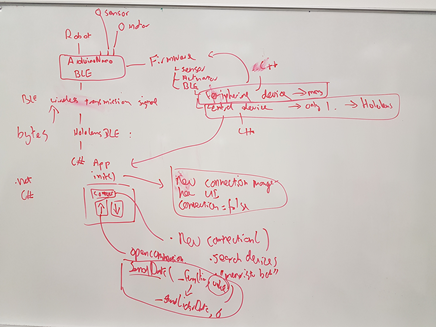
We discussed how the whole setup would be connected between the Arduino nano 33 BLE and HoloLens 2
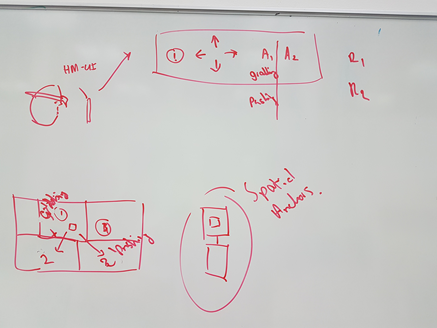
A quick discussion about the UI and some functionality of the Holobot was discussed. An easy to use interface shown on the HoloLens screen with interrupt button to stop the bot if anything goes wrong or we want to stop it to give new input. Four directional buttons to make the bot move in those directions and two action buttons connected to for example pickup item and drop item.
An idea of spatial anchors was discussed. We can map the room and make the bot change the way it operates in different zones, one zone can be a no drop zone, where the action drop item will not be allowed among other things.
Arduino
To easy the development for the Arduino Nano 33 BLE I handed over the Nano to solder on a few connectors for use with the Segger.
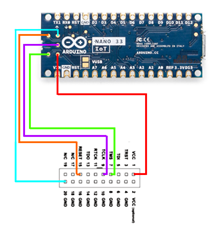
With this connected the development will be quicker in loading in code and for easy of use to see what the code does, for example set a breakpoint after connection of Bluetooth to see if it successfully connected to the right device.
A side note is ArUco, a library for better QR code reading.
A problem with QR code if used with HoloLens 2 is the range it can read the code, as you would be very close to be able to read it. If time permits it there will be an attempt to add this functionality to the project.
Utvikling av smarte systemer (Stian)
Arduino code for BLE system to connect with other devices
#include <ArduinoBLE.h>
BLEService batteryService(“1101”);
BLEUnsignedCharCharacteristic batteryLevelChar(“2101”, BLERead | BLENotify);
int oldBatteryLevel;
void setup() {
Serial.begin(9600);
while (!Serial);
pinMode(LED_BUILTIN, OUTPUT);
if (!BLE.begin())
{
Serial.println(“starting BLE failed!”);
while (1);
}
BLE.setLocalName(“BatteryMonitor”);
BLE.setAdvertisedService(batteryService);
batteryService.addCharacteristic(batteryLevelChar);
BLE.addService(batteryService);
BLE.advertise();
Serial.println(“Bluetooth device active, waiting for connections…”);
}
void loop()
{
BLEDevice central = BLE.central();
if (central)
{
Serial.print(“Connected to central: “);
Serial.println(central.address());
digitalWrite(LED_BUILTIN, HIGH);
while (central.connected()) {
int battery = analogRead(A0);
int batteryLevel = map(battery, 0, 1023, 0, 100);
Serial.print(“Battery Level % is now: “);
Serial.println(batteryLevel);
batteryLevelChar.writeValue(batteryLevel);
delay(200);
}
}
digitalWrite(LED_BUILTIN, LOW);
Serial.print(“Disconnected from central: “);
Serial.println(central.address());
}
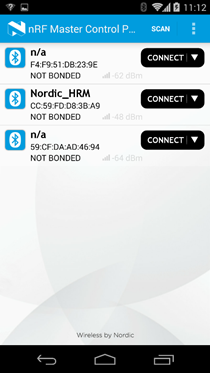
This code made it possible to connect to a phone with the Arduino nano BLE. The Arduino looks after devices it can connect to and makes a connection to that device when both are using BLE protocol instead of normal Bluetooth. This code just sends the battery status to the connected device. I connected this to my phone and got the battery status on my phone.

We are going to use this to connect with the HoloLens 2 but there we came up with a problem not with the BLE but with what the HoloLens 2 can connect too. The supported devices is Mouse, Keyboard and Bluetooth audio output (A2DP) devices. So, for us to make the connection with the HoloLens 2 we need to make it seem like a Mouse or Keyboard.
Mads
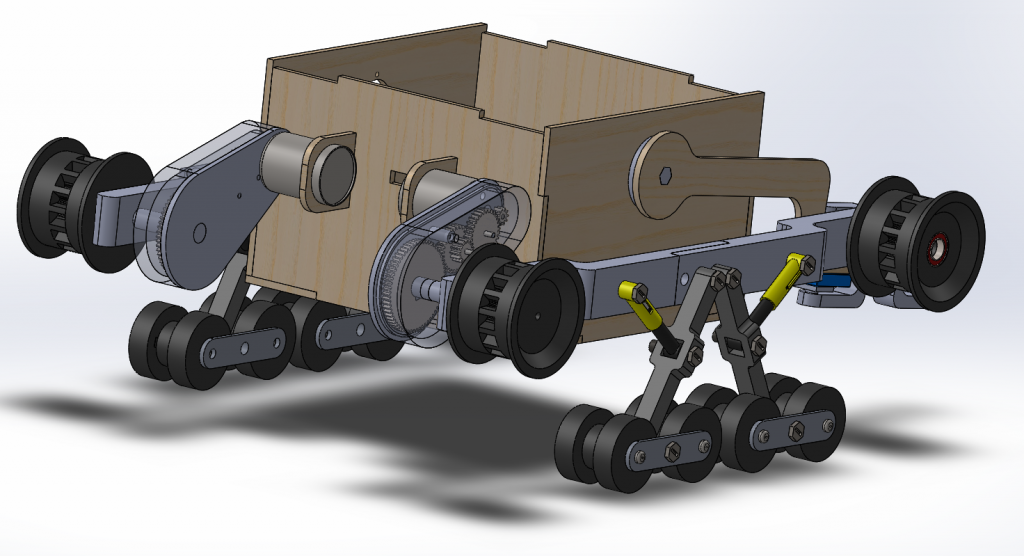
Two 3D printed prototypes later I’m finally able to print and assemble the Belt Modules. This has taken longer than expected due to slow delivery of the rubber tracks. Because they are a spare part for an RC tanks they did not come with the total belt length and I had to measure this manually. Minor tweaks has been done to improve the suspension as well as improved the mounting of the drive wheel.
The main body of Holobot has been altered to fit the dimensions for laser cutting. This has been necessary due to the increase in size, but also to reduce the amount of 3D printed parts.
I’ve designed a 3D printable gearbox with a 6/1 gear ratio. This prototype will be tested later this week, more on this later.
Last I have made a crude prototype for the arms and lifting mechanism. Calculation for the lifting capacity still needs to be done before I advance further with this module.