Sprint 4: 11.09.2020 -18.09.2020
Maskin (Simen):
After some trials and tribulations when attempting to print, because the parts were a tad too complex for simple 3d prints. With some heated discussions (and advice) from the teacher, I was made aware of my design flaws and found some pointers as to what to focus on onwards. After this, it didn’t take me long before I got a couple of ideas for the improvement of my design.
A pointer I got was to possibly combine an axle with my 3d printed parts (especially the arms) for the joint connector rods, the part that would hold them together until we replace/combine them with servos. Using axles instead of 3d printing them would both increase the smoothness of the surface finish on the connectors for the joints (which is an important aspect if you intend on moving the parts fluently) and decrease the complexity of a 3d print, while maintaining the function. The main goal for the next sprint is still to print the parts, with an improved (more like simplified) design.
Elektro (Sondre):
As mentioned last week, the signals that are sent out from the raspberry pi to the components and such need to be sorted correctly so that the signals end up at the intended motors. The idea for this was to design a multiplexer, and one way to do this is to utilize a FPGA (Field-programmable gate array). This week I managed to get my hands on one, a Basys 3 board which is a versatile FPGA for student projects like this. The idea is to program a multiplexer using VHDL, which allows us to make necessary changes along the way during this project incase there are additional motors that need to be included, or if we can use the FPGA for other components as well, such as sensors or other types of actuators.
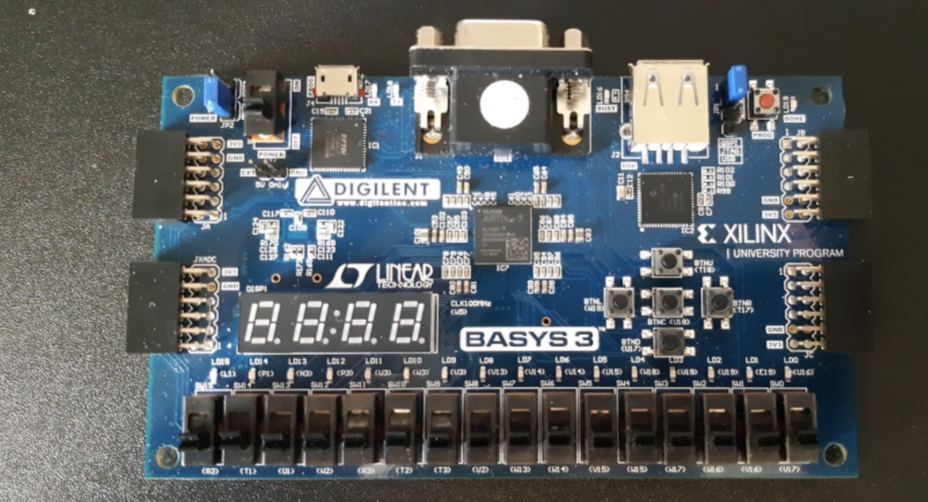
I have worked with this board earlier in the Vivado design suite, which is its intended design suite, so I already have some experience with VHDL. Programming a multiplexer with VHDL is a relatively easy task which I already have started looking into, but connecting the raspberry pi, motors, and possibly more to the FPGA is all new to me, so I therefore plan to make a prototype in the coming week to see how it will work when putting it all together. By testing this using some unspecific motors also gives the opportunity to look into how we will power all of the motors, since it will probably be a bit of a stretch expecting the raspberry pi or the FPGA to efficiently run all of them.
Data:
A lot of time for us computer engineers this week was used to set up our newly acquired raspberry pi 4. We chose to start with the fully fledged operating system so we could code straight to the Pi just by connecting it to peripherals. We may get more performance from our system if we use the command line based lite version of the operating system, but we started with the full version as we believe it will be easier to test and debug. If we notice that we need a lighter OS we could change further down the road without having to write the code again. After flashing the os we downloaded the needed software for image recognition and processing.
Danial(Code ROS) :
I have searched a bit on miscellaneous for recommended programmers to code the robot arm. ROS is suitable for creating several small tasks, and putting these together and getting the robot to perform as desired. The advantage of using ROS is that it connects nodes, several pieces of software to one big software. There are also several libraries and tools that will help us with the development of the robot arm. The algorithms are ready for robot movement, as well as the tools for visualization and simulation. I have started to look at how we should code and make the robot arm work so that it works as we intended. We will make the robot move in many axes in several stages. As the picture illustrates. I am pretty excited to start using ROS and get the robot moving.

Azim:
This week I encountered various problems trying to install TensorFlow on the raspberry pi. All kinds of different error messages and commands that bugged out. After spending days on this problem, and finally restarting the whole process, including reinstalling the operating system, i finally managed to download the required libraries for our project.

I also continued my work from last sprint where i generated training and test data for our model. This meant, taking pictures of the card deck we want to use in our game, and then labelling it using “labelimg”. This process is long and tedious because you need pictures from different angles and different lighting to ensure proper optimization of the model.

Process of labeling data
Moreover, I began developing the script for the blackjack game in python. Some important aspects here include having multiple players, some sort of (not real) gambling system etc.

As i approach the next sprint i realize that i’m working on a lot of separate tasks, so my goal for the next sprint is finishing them as best as i can, and then combining them as quickly as possible, so we can do proper testing and verification.
Bjørnar:
For this week I had hoped to verify that our app could successfully connect to the Raspberry and send data. Since the setup of the Raspberry took many hours more than what we had thought I did not have time for this before the end of the week. On the other hand I am now pretty sure everything is working if i just run the python script i wrote on the Raspberry. The python script is quite simple in its core. It simply uses the “bluetooth” library to listen to data sent from connected units over the socket. If it receives a certain dataset then it will perform a certain function. Inserted below is a snippet of how this is set up.
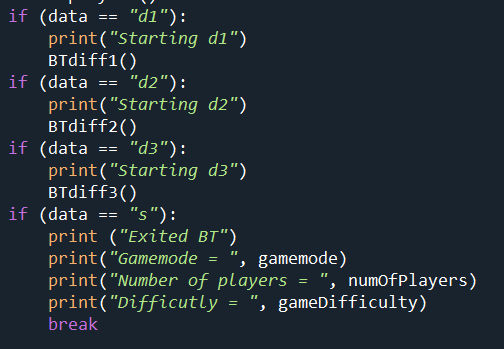
With this method we can start any process in our robot from any connected bluetooth device running our app. Sending the string “p1” from the app will result in the python script executing a function that sets the number of players to 1 and so on.
For the python script to work I naturally also had to change the application. All the buttons are now linked to sending a certain string over bluetooth if the phone is connected to the raspberry. I also swapped from debugging on an emulated device to an actual phone. This way i found out there were some permissions and other system files I needed to change for the phone to actually be able to send data via Bluetooth. While the user interface is still very much work in progress i made a few changes for ease of use as you can see in the image below.
