August:
Richard Thue:
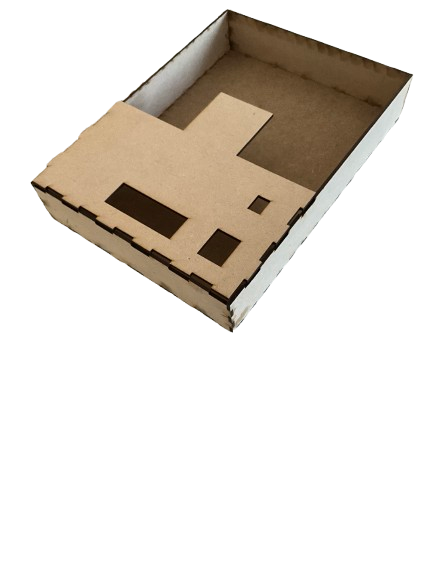
This week I had to analyze some sick car design sent on email from some crazy computer engineer students with big S. The drawings was deficient to say the least, but I handled it and provided what the guys needed. I think they where pretty satisfied about the result (yes, we are!<3 best regards group 5). This is the design I was sent:
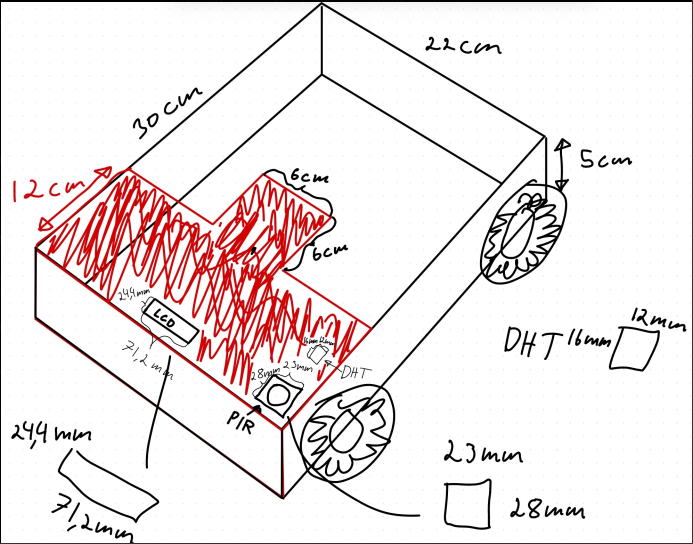
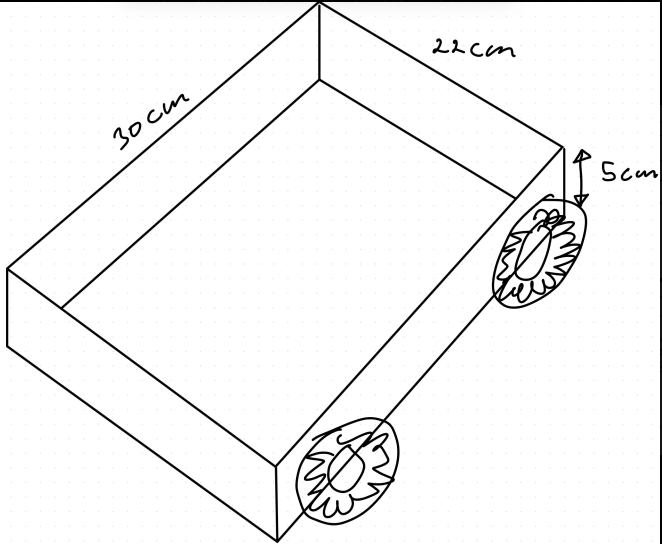
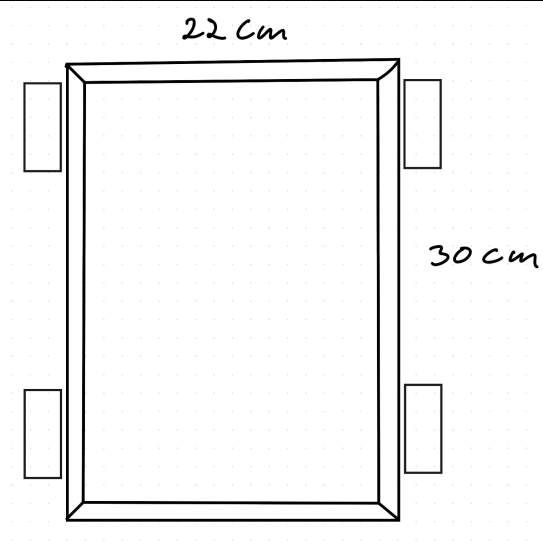
I, Richard Thue, dakka this:

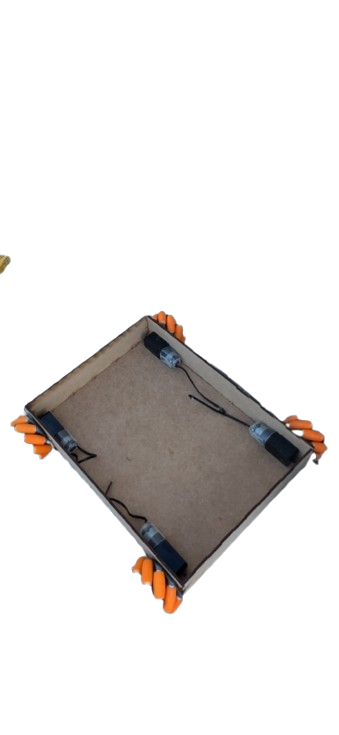
And mounted the parts:
I then placed the frame in the service torg. Now the rest is up to the guys!
Delicate Terminal Hands gone Dirty
Mounting Parts to Frame
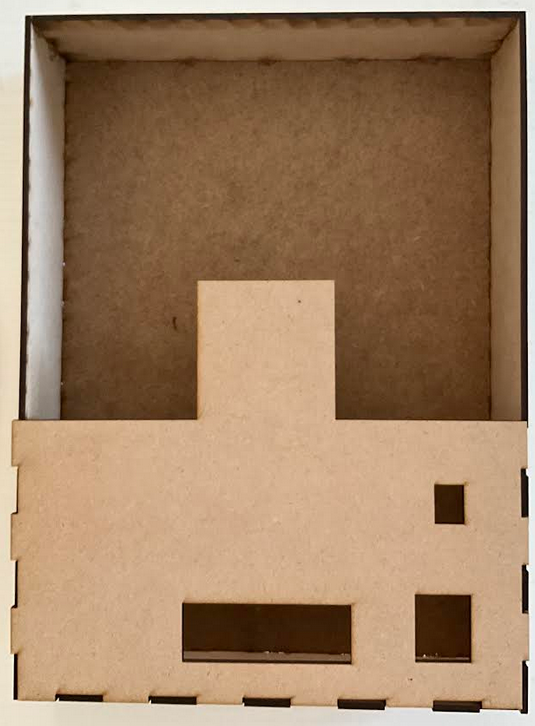
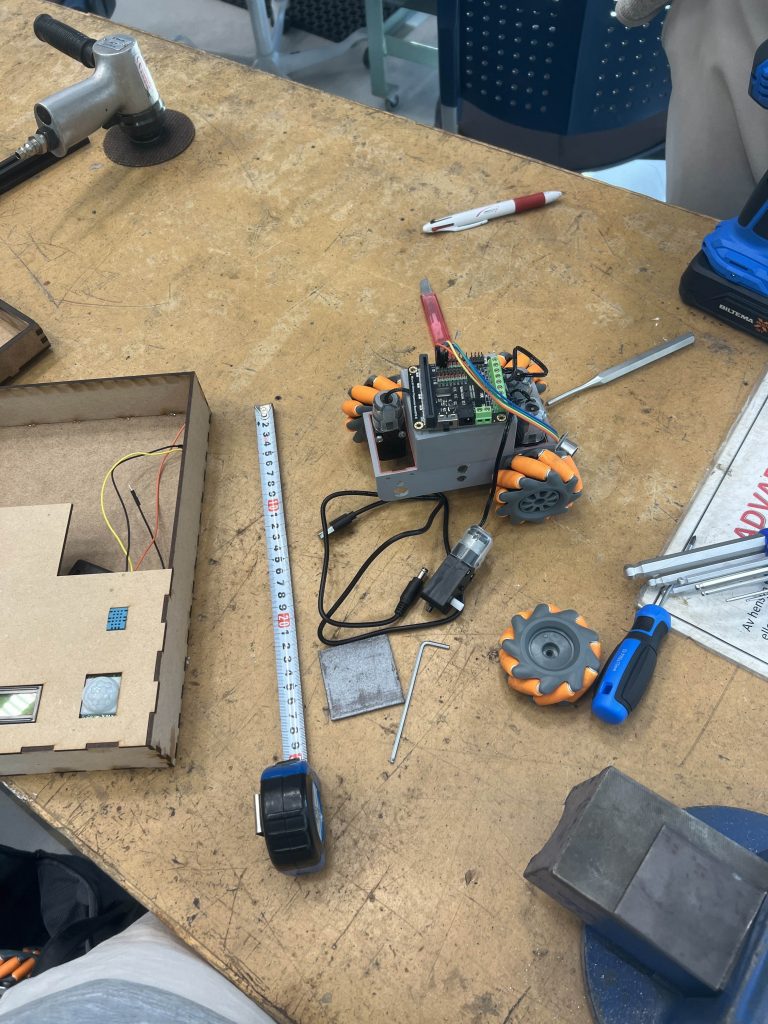
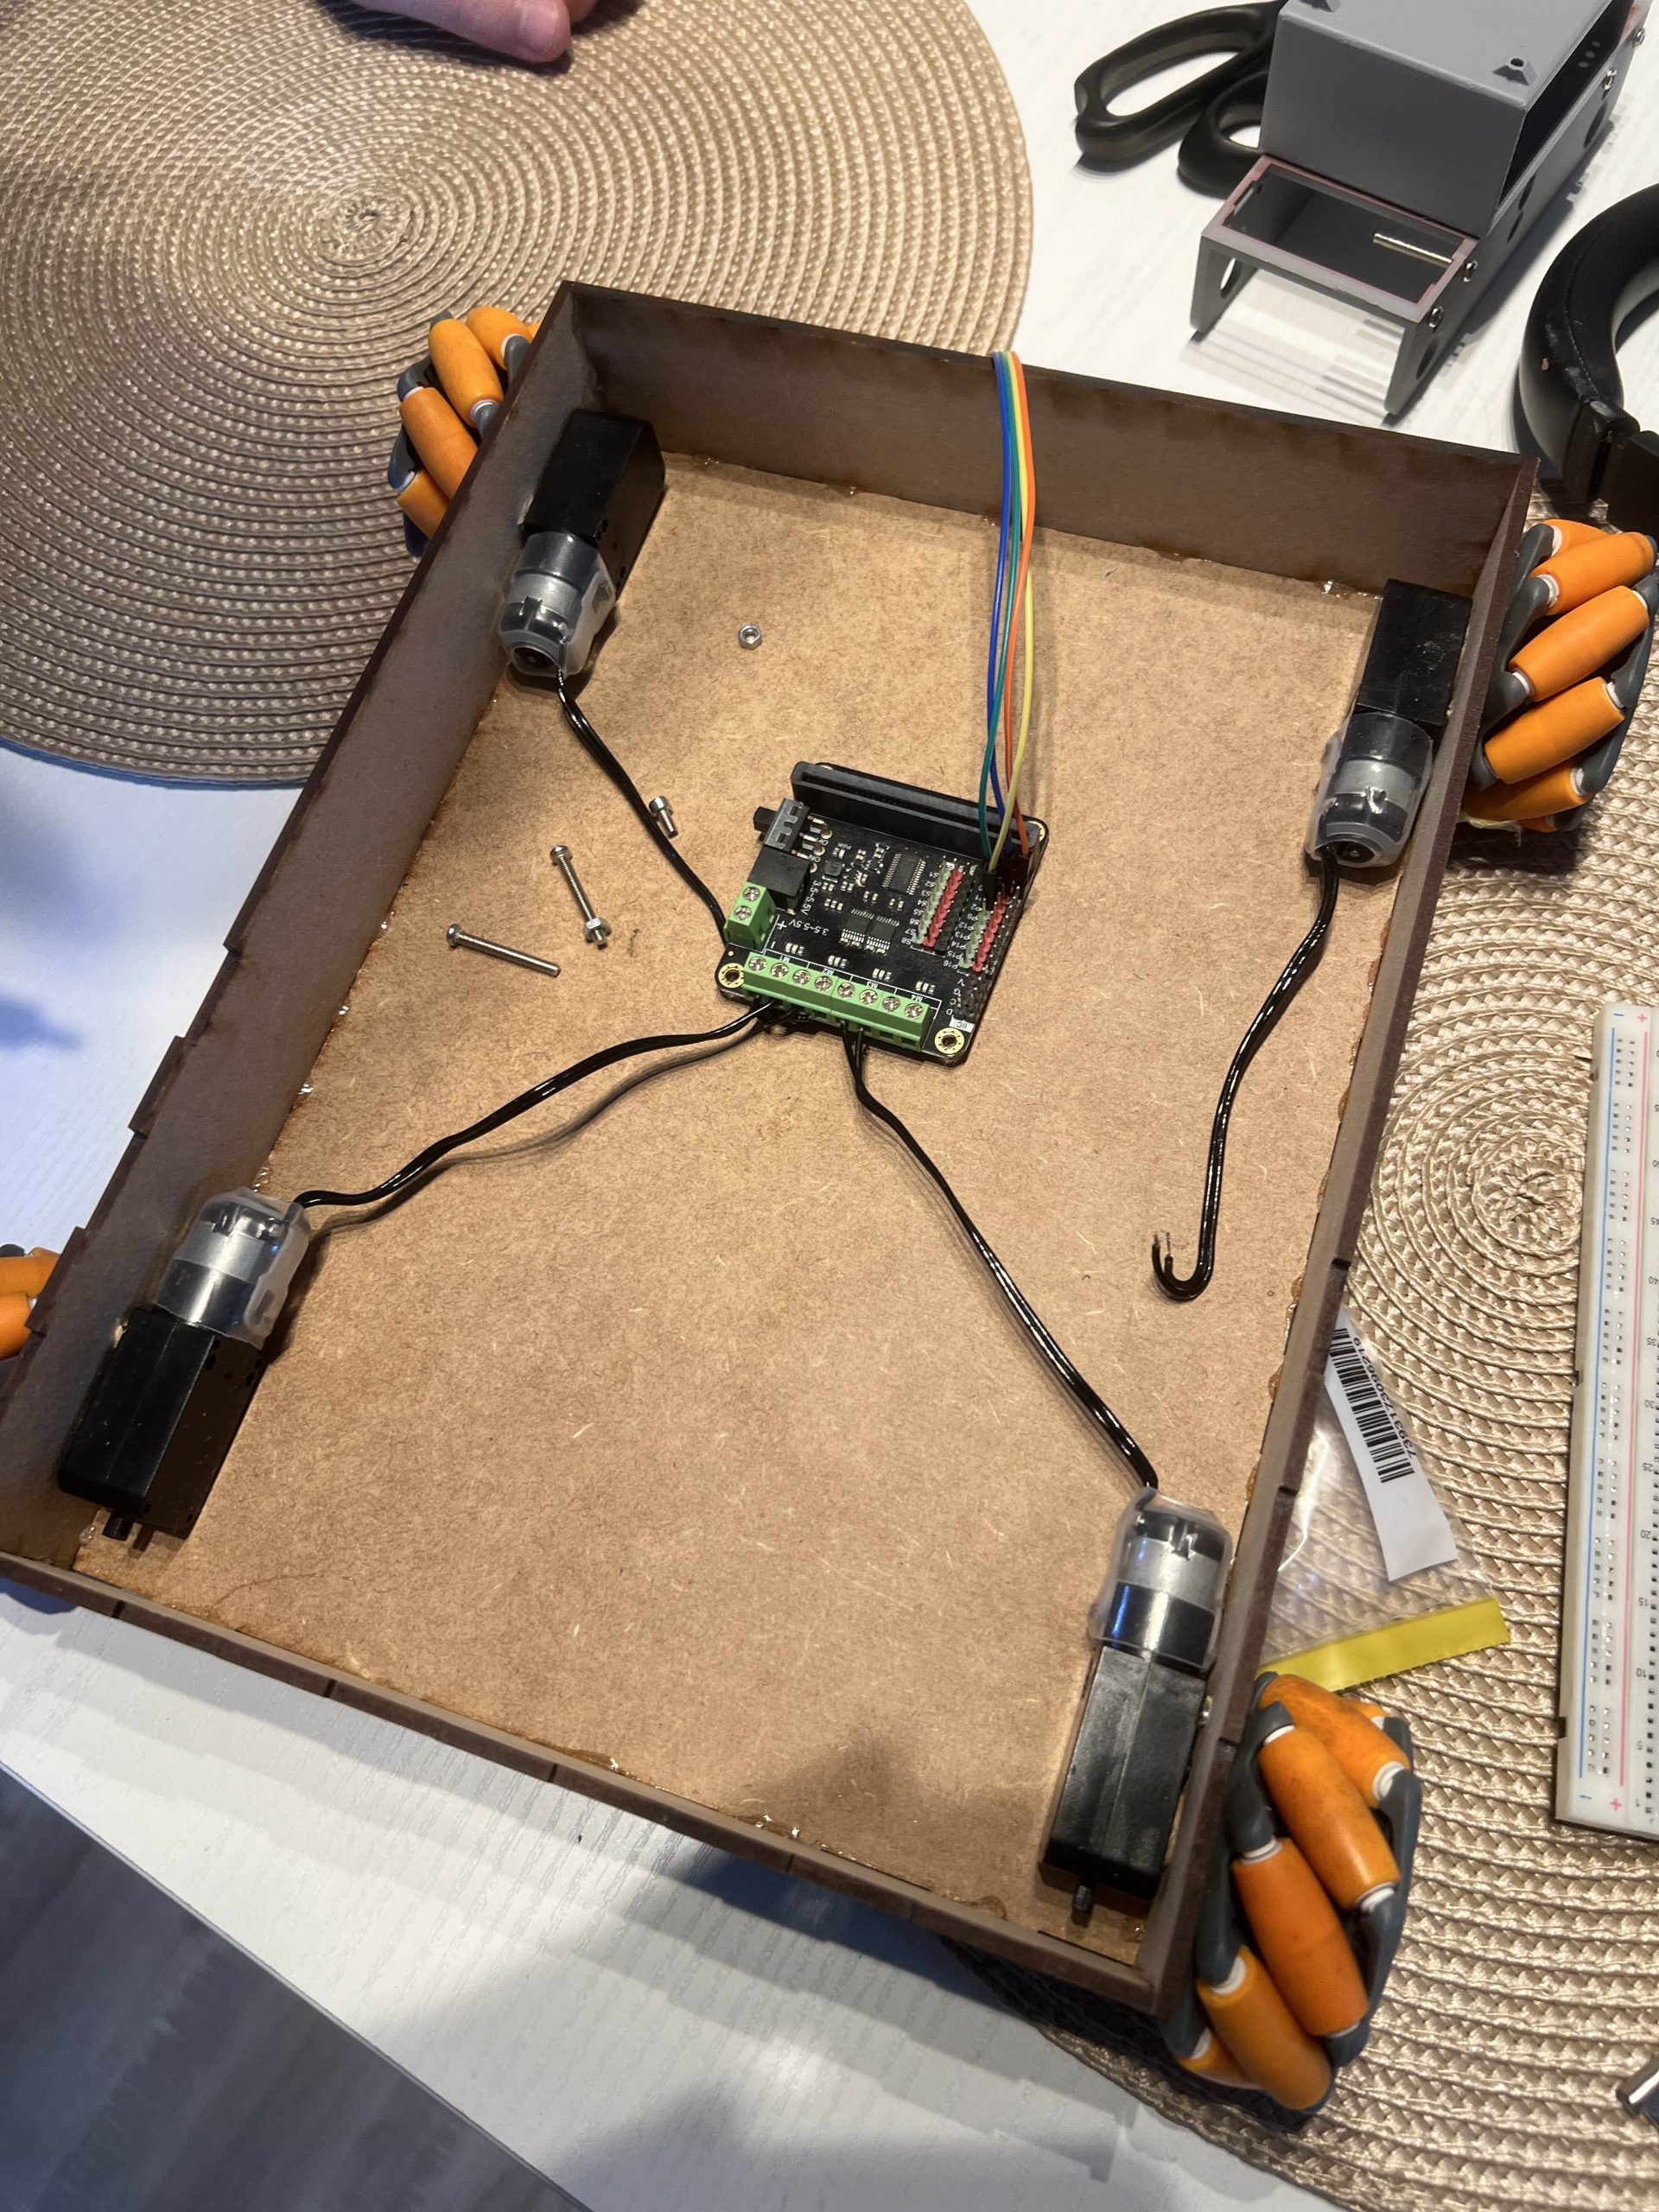
Thank you, Richard! Vi tar over stafettpinnen! Sander and I picked up the car at the service torg and rushed home, acting like kids on christmas eve. We couldnt wait with mounting everything. Without further ceremony, this is what it looks like with some of the sensors and the LCD-screen:

Connecting Wheels to Frame
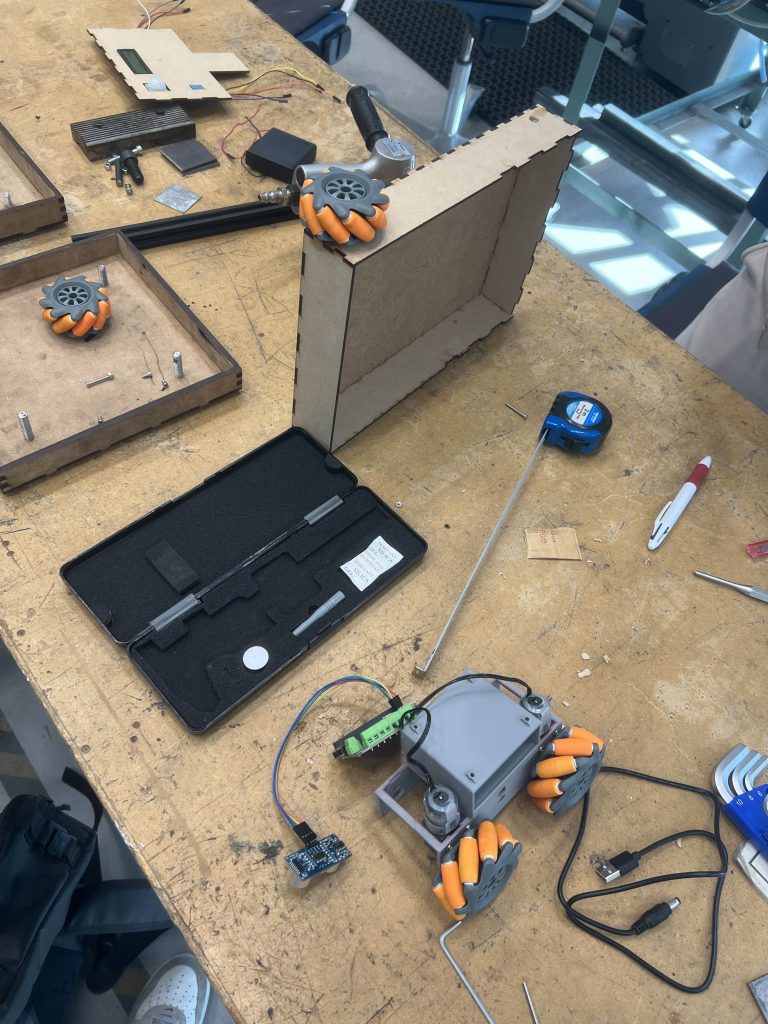
This was difficult and time consuming. We used a drill and bor in order to drill holes in the frame. We had Richards voice in our heads while finding the correct spot to drill. We measured to center of the wheel, and found out that we had to measure 2.5cm from each side, and 1.5cm from the bottom. The plates bygger 3mm, so thats why we ended up with 1.5cm. From center to center each way, it is 25cm. This is for now perfect. The physics for the mecanum wheels works.
First drive!
We do experience some trouble with friction. We will talk to both Steven and Richard for tips. Maybe we just need to drill bigger holes for the wheels.
We will make placeholders for RGB-light, Photoresistor, led-pins, Ultrasonic Sensor, IR Camera and a fire pin, and a lot of other insane stuff. This is the first thing we have accomplished without sitting in front of the terminal. Pretty fun! Cant wait for the next iteration!
Iterating the Sensors, Arduino and Implementation of IR-Diode
I implemented that the RGB will change colors after what state the sensors are in.
Magenta when sensors in AUTO.
Blue when ON
Off when OFF
Laser-Green when in GUARD
Red during ALARM
Fire-Orange in FIRE
I do struggle a bit with electronical interference when the RGB light is running. Theres an annoying summing in the background, and every time the arudino is printing to the Serial Monitor, the RGB blinks.
IR Sensor
I want to implement a IR Sensor which detects fire. The problem however is that the sensor reacts to me as well. I did some research and found out that I as well sends out IR radiation, and the two-pin IR Sensor reacts. I dont want to spend more time on finding a solution, so I will order a “Fire Module”, so its more plug and play.
I have implemented the code (I will probably have to do some changes when I recieve the Fire Module:
IRSensor.h
#ifndef IRSENSOR.H
#define IRSENSOR.H
#include <Arduino.h>

class IRSensor {
private:
    int m_IRPin;

public:
    IRSensor(int IRPin);
    void IRBegin();
    int IRPinGetReadings();
};


#endif
irsensor.cpp
#include "IRSensor.h"

IRSensor::IRSensor(int IRPin) : m_IRPin(IRPin) {}

void IRSensor::IRBegin() {
    pinMode(m_IRPin, INPUT);
}

int IRSensor::IRPinGetReadings() {
    return digitalRead(m_IRPin);
}
Iteration of Connecting Scheme
Didnt find the time. Will make it next week. This is essential, in case of lose wiring between the arduino and the modules.
Picking up from last week
WSL in Windows -> Full blood Ubuntu Dekstop OS
The day I never thought I would see, came. I promised myself to never be one of them, but now I have dual booted my PC, choosing between Windows or Ubuntu when booting. I had no choice, at least that is what i tell myself.
I downloaded the Ubuntu distribution 22.04 on a minnepenn, and uploaded it on the PC when i rebooted. I then had to set up the terminal again. I generated a new SSH-key and pasted it in the RPi4 Ubuntu server, in the Authorized_key file. I then had to download ROS2 humble again, using this guide: https://docs.ros.org/en/humble/Installation/Ubuntu-Install-Debs.html. I have done this thirty times now, so it went pretty fast.
The whole reason I did this, is to make everything work seamless. I hope that it from now will be more plug n play. No more NAT-type in the fricking WSL , or changes to be done in the jsons.
And just lik that…
No, im not Sarah Jessica Parker living the dream in New York City starring in And just like that… on HBO Max. Im living the dream in the terminal, living for results. Results just like these:
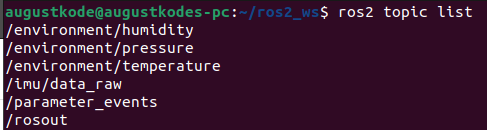
Close to plug and play, baby! Now I am able to see the topics the RPi4 is running, on my PC! Even better: I do get the readings as well!
Simulation in Gazebo
I wanted to do a simulation of IMU output in Gazebo. I did some research: https://emanual.robotis.com/docs/en/platform/turtlebot3/simulation/, and found out that the easiest to try is with Turtlebot3. I just want to see how this data will look like, before i implement this with the Sense HAT. In ROS2 the Z – axis points upwards, the X – axis points forward, and the Y – axis points left. Just as seen in the photo under. Red=x, Green=y and Blue=z.
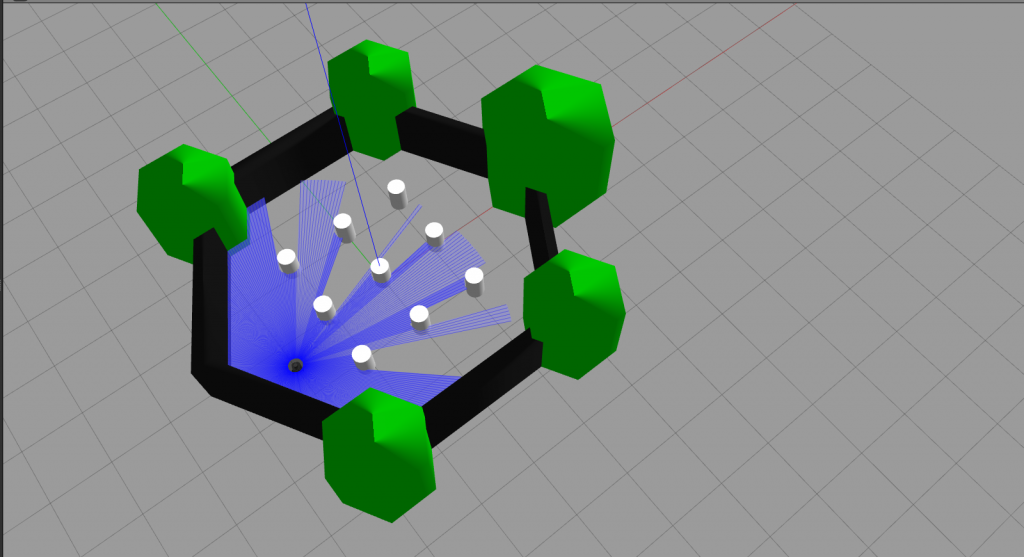
Yaw Simulation – Z-axis
Crazy Simulation
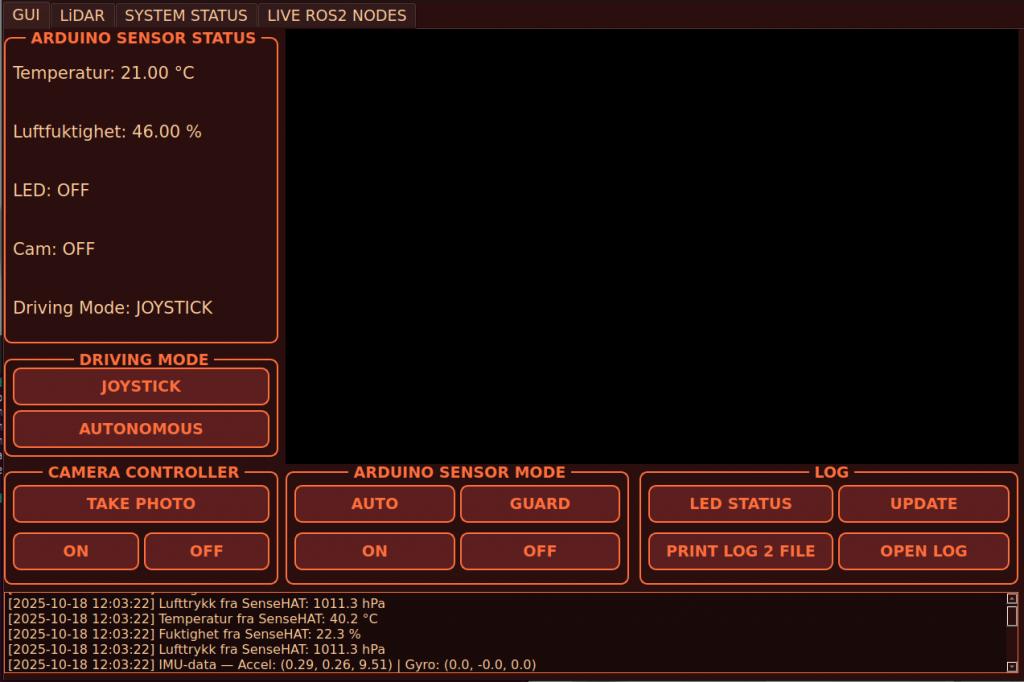
GUI
I have made a lot of changes in the GUI. Believe it or not, but this is even bigger changes than when Apple moved from iPhone 4 to iPhone 4s. There is now a dedicated system reboot button. This button reboots the RPi4, by using the paramiko library, which is a full SSHv2 protocol. It sends sudo reboot now to the RPi4. I have to include the name of the RPi4 and my password in the script.
In the system status I have implemented the boxes as how the hardware is connected. Everything is connected to the RPi4, and it makes it easier for new users to see how everything is connected. This is just first iteration, so I will make it better, and more accurate. I have implemented a QTgraphicalWidget as a background. If there is space, and Steven thinks its a good idea, I will in draw.io make lines and arrows, and label the lines if they subscribes or publishes. I will then upload the picture of the lines to the graphicalWidget.

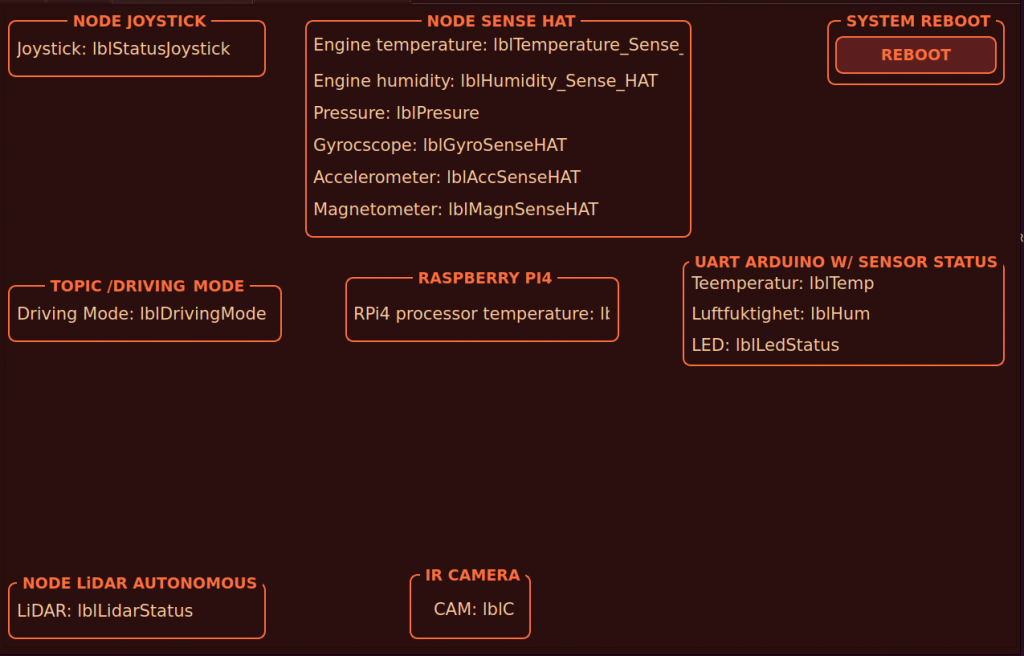
Next GUI iteration
My plan for the Live Ros2 Nodes site in the GUI, is to implement a box for every hardware component, which is represented by a node. If a node is up and running the box will be green, if not, it will be red. I also want lines between the boxes. I think this would be nice, both to see how everything is connecting, but also easy to see if something stops working.
Before I do this, I will combine what I have from the Sense HAT. Now we have the topics:
/environment/temperature
/environemnt/pressure
/environment/humidity
/imu/data_raw
/imu/mag
Next week I want to implement /imu/orientation. Now we get the imu data. The next will be to fuse the imu data using madgwick. This will help the LiDAR to be more accurate. Like mentioned before, our main goal is to have an autonomous car. We will eventually get there!
Sander
We back, this week started with more Ubuntu problems, after an bios update due to some other computer errors, I had some problems with getting Ubuntu to boot. Ended up with reinstalling it completely, some more time was used to install everything and getting ROS 2 up and running again.
August and me also finished the drawings and sent them to Richard.
Later this week we received the laser cut parts and started assembling the car.
The fact that we got and assembled the car and that I got PC issues this week affected the tasks I planned to do this week.
I started with some lidar visualizations in Gazebo.
Furthermore I watched some more videos on SLAM and specifically how to use the slam_toolbox in ROS 2, specifically how to simulate SLAM using gazebo and rviz together with the ros2 slam_toolbox. Spent some time getting gazebo up and running, using the visualize_lidar.world that is included in gazebo, but I did som modifications to make it more like our system with the lidar, reducing the samples and increasing the range. I also didn’t like the world that came with the example so I found a better one to use when working with a lidar.
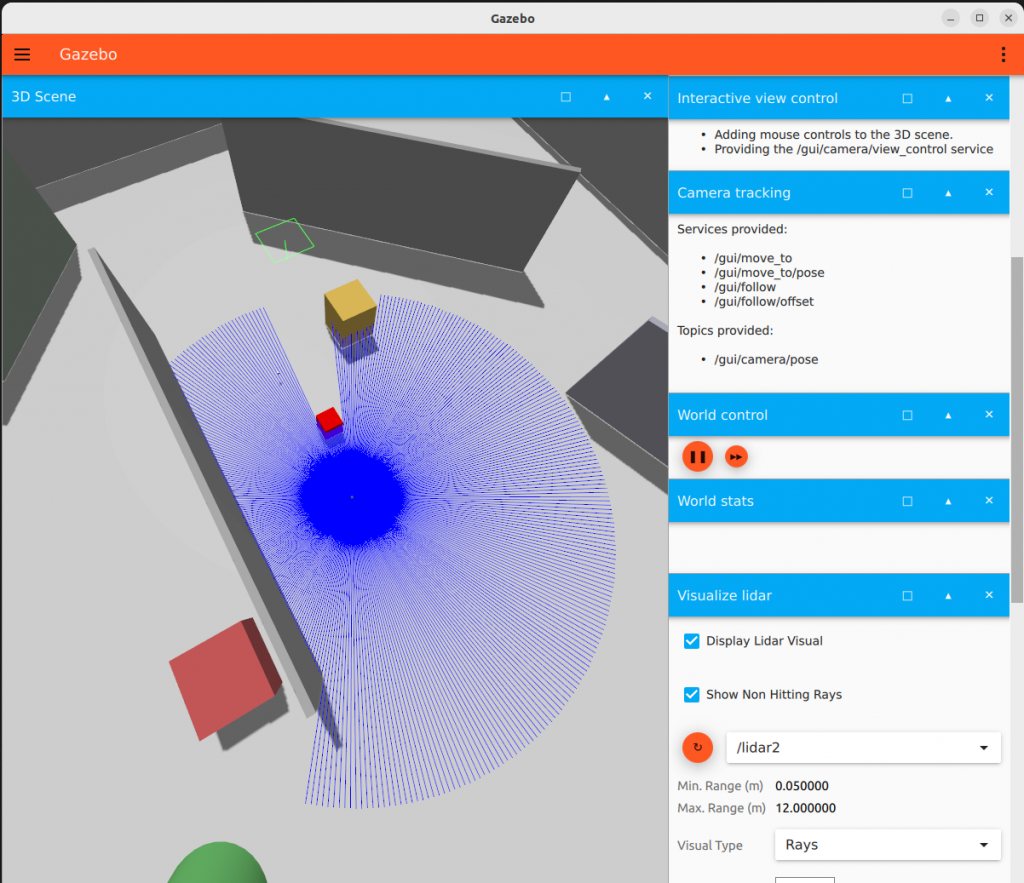
I did not get the mecanum wheels to work in gazebo, so I stuck to using the included car, this will still work as we will used simplified steering for object avoidance either way.
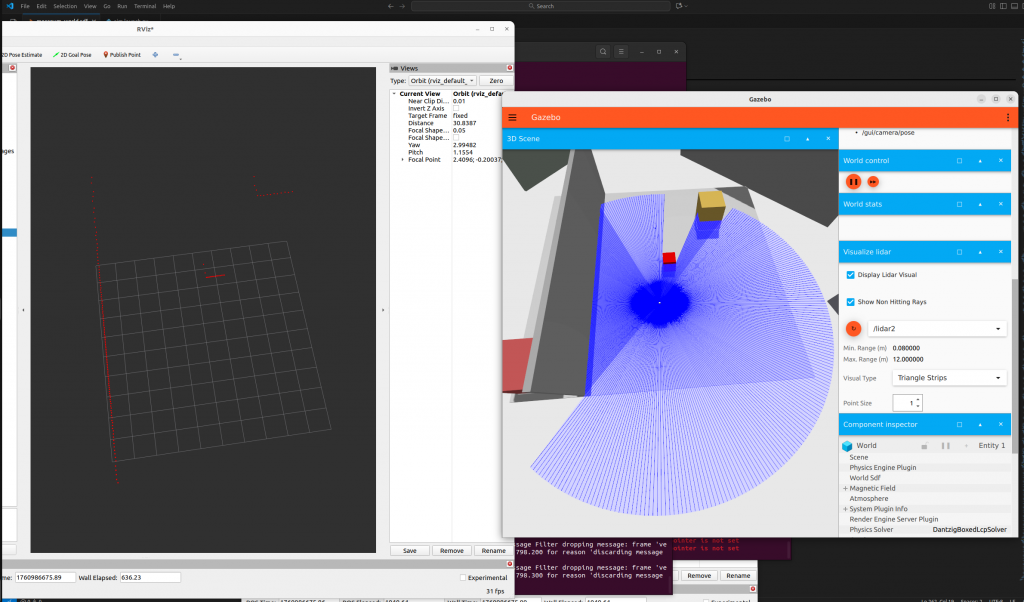
After way to much time spent, I finally got gazebo to publish on the topics using ros2_gz_bridge, next step from this will be simulating SLAM using the slam toolbox from ros2 and visualize and test this in rviz. This was used to get this up and running, and its the car im using https://docs.ros.org/en/humble/Tutorials/Advanced/Simulators/Gazebo/Gazebo.html
I have also been looking into some path planning algorithms and tools. Will look more into Nav2 this week.
I had some trouble getting the car to drive so this will be on the to do list this week together. I will also try to get this working on the physical rover this week when i get my hands on the sensor hat. This was a great learning experience for proceeding with implementing SLAM next week. Now that I have a testing environment it will help with the development of the rover.
Next weeks priority 1. will be mapping and autonomy.
Sondre
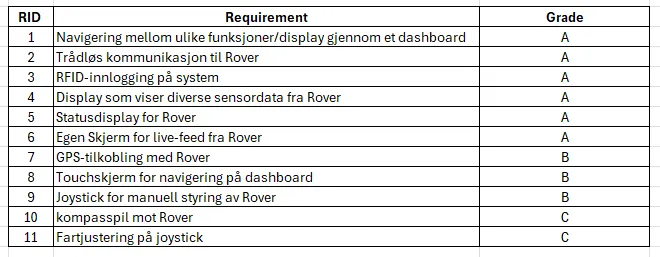
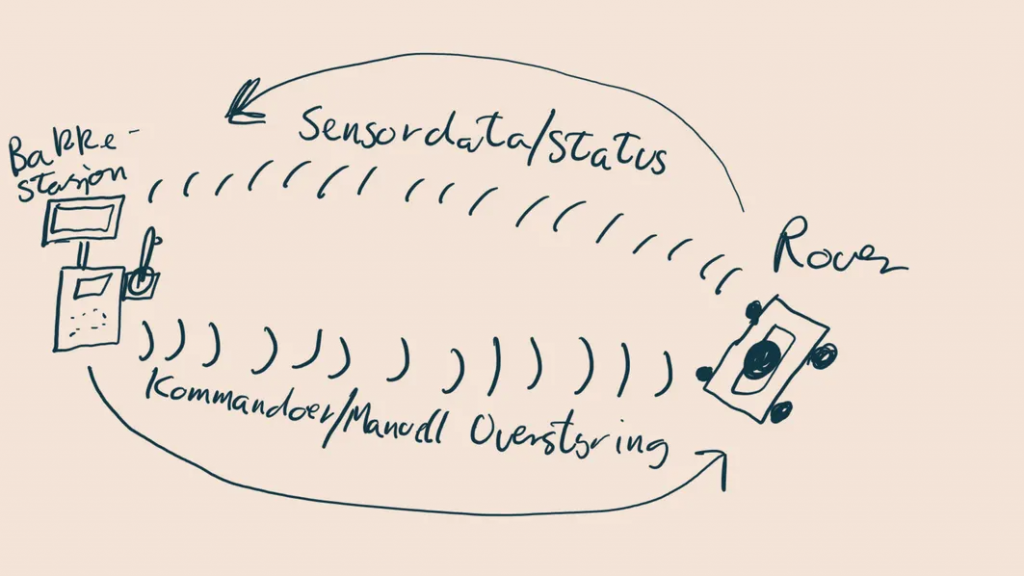
We started the week with a group meeting on Monday. We found out we had to expand the project to be able to find enough tasks for every teammember. We decided to Implement a dedicated Groundstation for our Rover, which I and Oliver will work on.
Me and Oliver had some brainstorming later that day to define the functions and requirements of the Groundstation. We devided them into ABC-requirements to make it easier to prioritize our time.
i also made a simple high level drawing of the workflow for our new expanded project:)
I also created a new github repository for this “sub-project” since the Groundstation and Rover is two “independent” systems in our project, and to just learn some more about git/github.
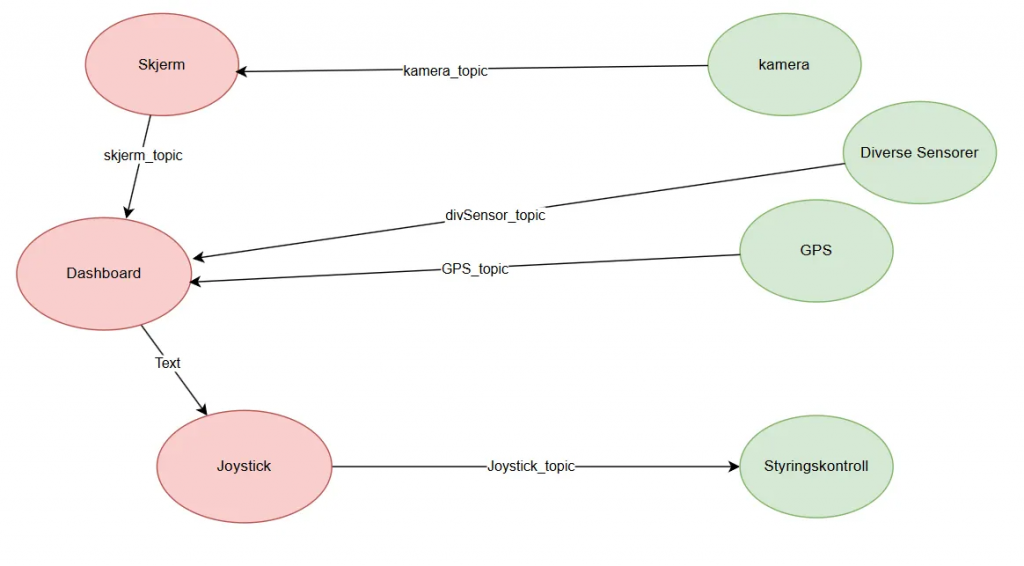
Since everything is dependent on the dashboard i started to dive into that. I made a simple ROS Node Overview for the dashboard to make it easier to see and understand how the flow between the nodes will be. The red nodes comes from the groundstation and the green is from the rover. The topicnames for now are just placeholders, where i later will switch them out with the real topicnames
We are making the dashboard in QT which is a new program i never used before, but i have started looking into it and watched some guides. I will cointinue with QT next week.
This week achivements:
- extension of project (Groundstation)
- ABC-requirements for groundstation
- ROS Node Overview for dashboard requirement
Plan for next week:
- Get started with QT
- talk with steven about GPS and Touchscreen
Oliver
I continued working with the LiDAR, but I still haven’t received the belt. I bought a rubber band in the meantime, but the ones they had were a bit loose. This caused it to slip off occasionally, which results in incorrect readings.