August:
We are back on the horeseback. This week we have started to make the car autonomous to the max. In our first iteration we will make it dumb autonomous. What I mean with this, is that we will make the car drive forward, and stop driving when the Ultrasonic sensor detects obstacles closer to the car than the threshold allows. We will later integrate this with the LiDAR, and make it smart. As always I will follow best-practice. In this way, it will be later to integrate with ros2 and it will be easier to maintain the code, implement functions to the code, and to read the code.
Before i start a task, i want to make sure that I dont miss a thing. When Sander and I wrote on the Game Design Document, he made a list in excel. Hes a frickin genius. We will never forget anything ever again (unless we forget to write something on the list).
Implementation of Ultrasonic Sensor – Start of Autonomous Driving
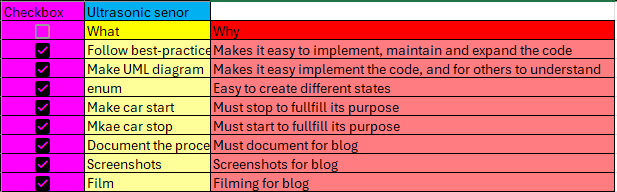
Ultrasonic Sensor – Check List – Iteration 1

I started by getting a grip of how to connect the Ultrasonic sensor (from now US) to the correct pins on the microbit drivingboard. I of course did that by following best-practice and created a kopplings scheme:
Connection scheme
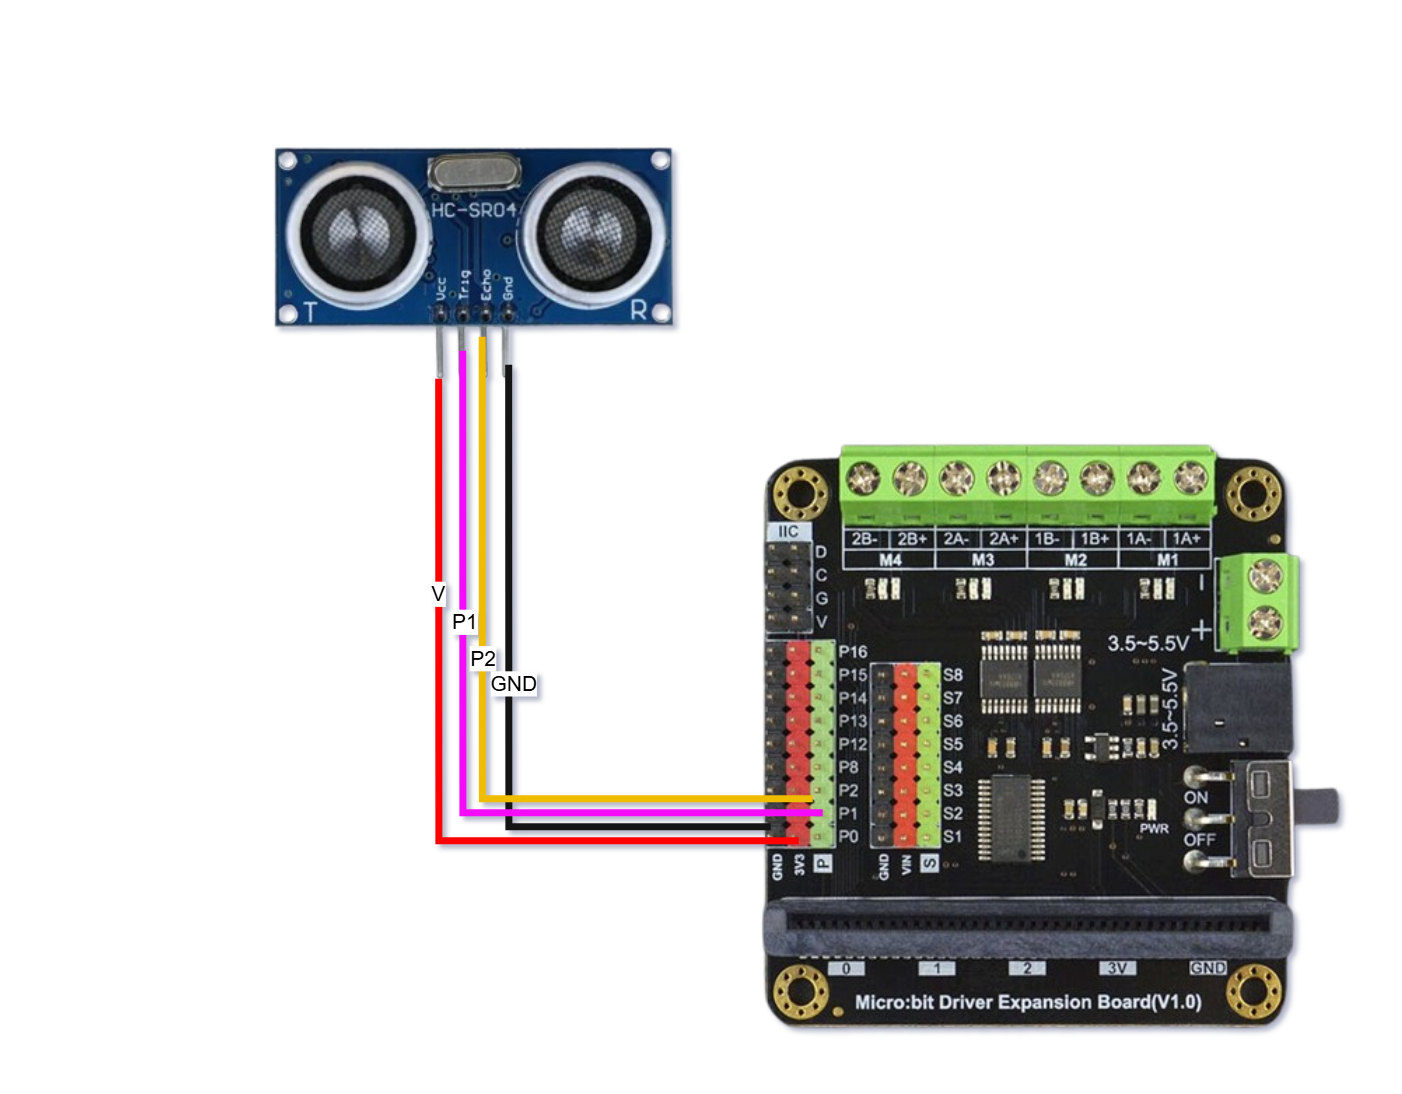
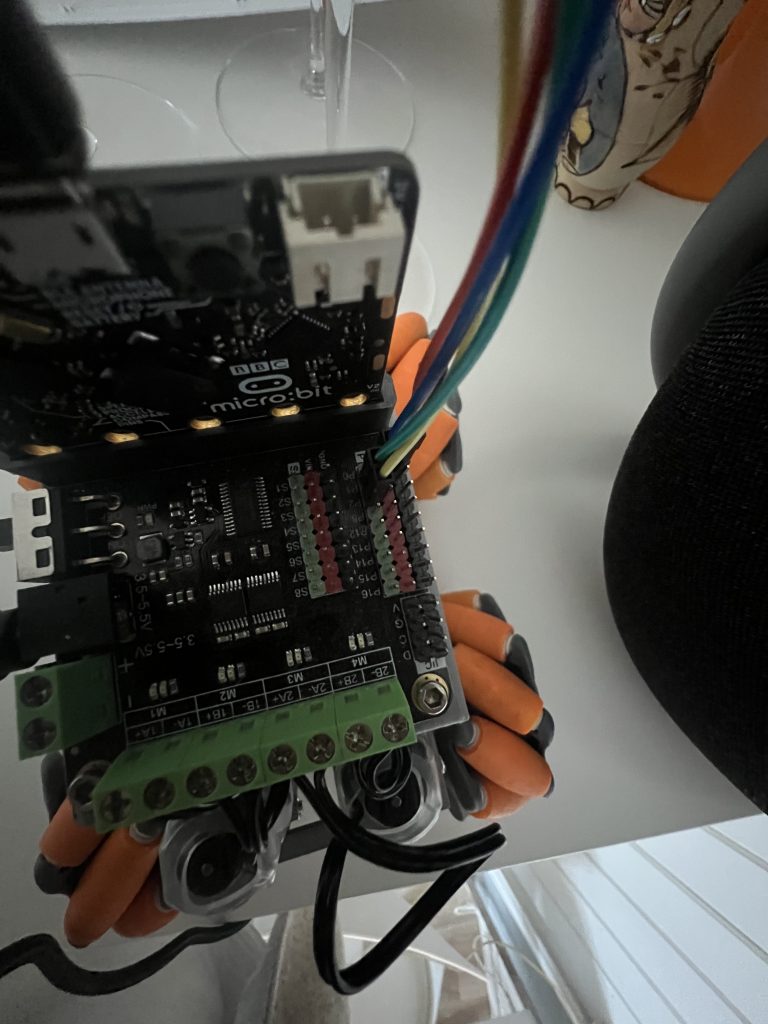
Then i connect the pins physically.
VCC->3v3
TRIG->P1
ECHO->P2
GND->GND
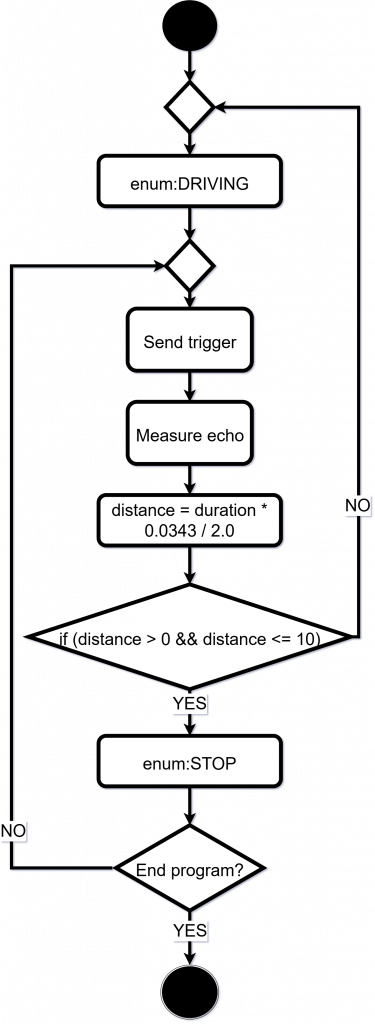
Simple Flow Chart of the Implementation
The code is more complex than this, but its a good way to explain to others, I think.
First Ultrasonic Sensor readings
When this was okay, I implemented an easy code, just to make sure that the hardware worked, and that I got readings in the terminal.
I then wanted to make the car drive forward. I struggled sometime by myself, but after some time, I contacted Sander. He had worked on this, and he sent me a code. I then got the car starting.
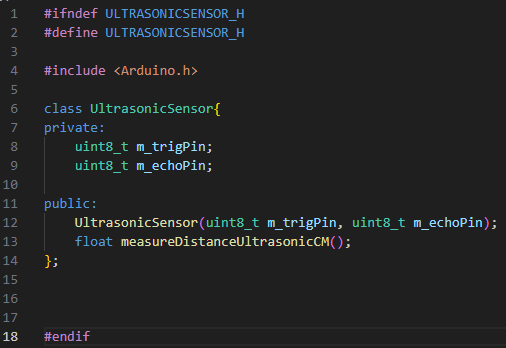
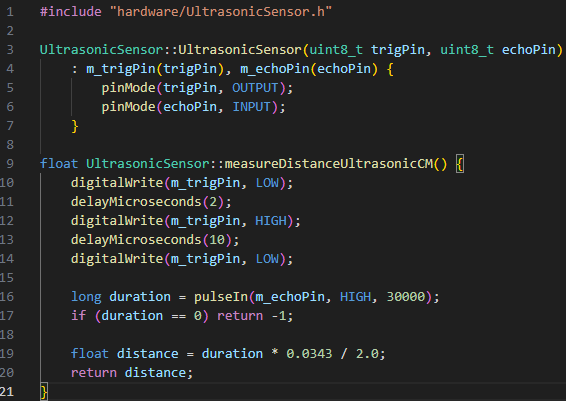
After this i implemented OOP code the Ultrasonic Sensor. Extremely satisfying work. Picture of the US code:
UltrasonicSensor.h
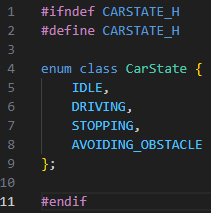
CarState.h
UltrasonicSensor.cpp
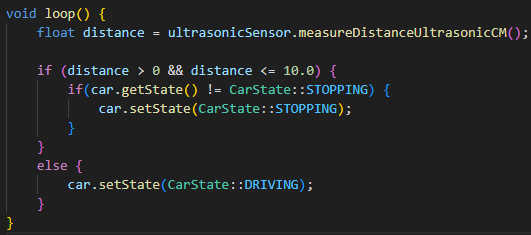
main.cpp
This will probably be implemented to a function on a later iteration. When we will integrate this to the others sub system running on Ros2 together with the LiDAR.
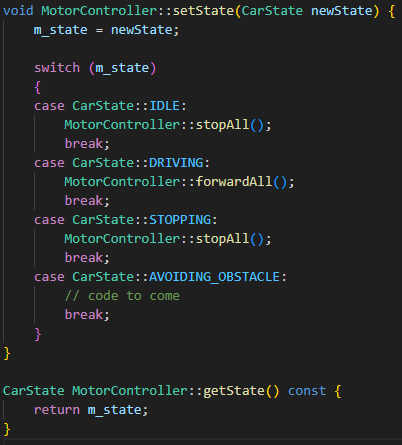
Important from MotorController.cpp
This code will change drastically in the next iterations. Its just a matter of time. I will probably make a lot of handlers, that will be the functions in the different switch cases.
Plug and play
After OOP the code, it was plug and play:
List after finnishing this task:
Pushed to gitHub, quality approved, and moving on for more fun!
Sense HAT – Gyroscopic and Accelerometer – Continuation of Autonomous Driving
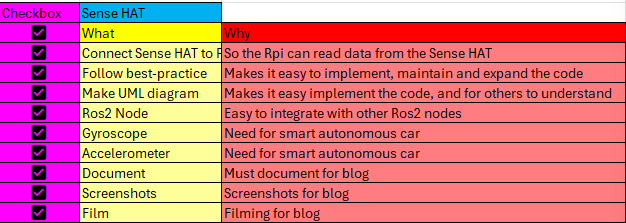
Sense HAT – Check List – Iteration 1
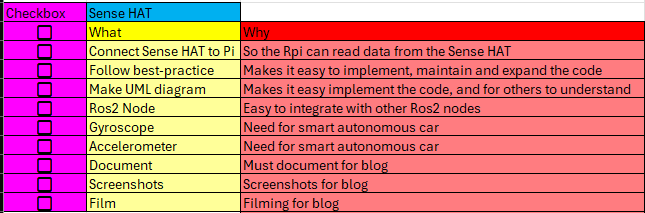
We want to make our car autonomous. We could just implement US on all sides, and had default forward driwing, move if oubstacle is in way. But we want the car to be smarter, and hopefully do some sort of A*algorithm. To make it smarter we want to implement a LiDAR, and Sens HAT. The Sense HAT have both an accelerometer and a gyroscope. With this as our starting point, the sky is the limit.
Connecting Sense HAT -> RPi4
I started with connecting the Sense HAT to the GPIO-pins to the RPi4, turned it on, and this is what it looks like:
I then had to see if I had contact with this. Wonder if it is plug and play. The thought of not using 2-3 hours on just getting readings would be fricking amazeballs. Lets find out!
See Sense HAT in Terminal
Started by giving commands:
sudo raspi-config
There I enabled I2C and pressed finish. Then:
sudo reboot
I then prompt:
sudo apt install i2c-tools
and voila:
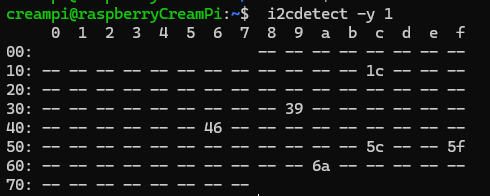
- 1c = IMU – accelerometer
- 6a = IMU – gyro
- 5f = Temperature and Humidity
- 5c = Barometer
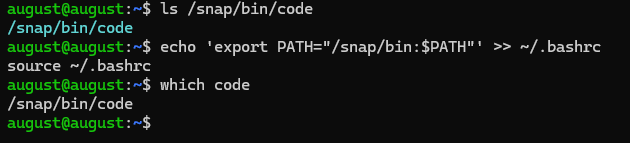
The first hickup – SSH -> RPi4 via VScode
My good friend and genius, Sander Pedersen, showed me that he could connect to the RPi4 via ssh from VScode. This was fricking awesome, but he did it on his stationary pc, where he has Ubuntu downloaded. I had to do it from a wsl terminal opened in powershell. This took aproximately 2 hours to fix. It was easy, when i found out what the frick was the problem. When I typed code . in the WSL terminal, vscode still opened the windows version. I had to fix the path. Thank god for terminal magic, and le prompt: which code. There was also some issues with the password for the ssh key, but this was fixed in the user setting json file. Lets continue. Mate på.
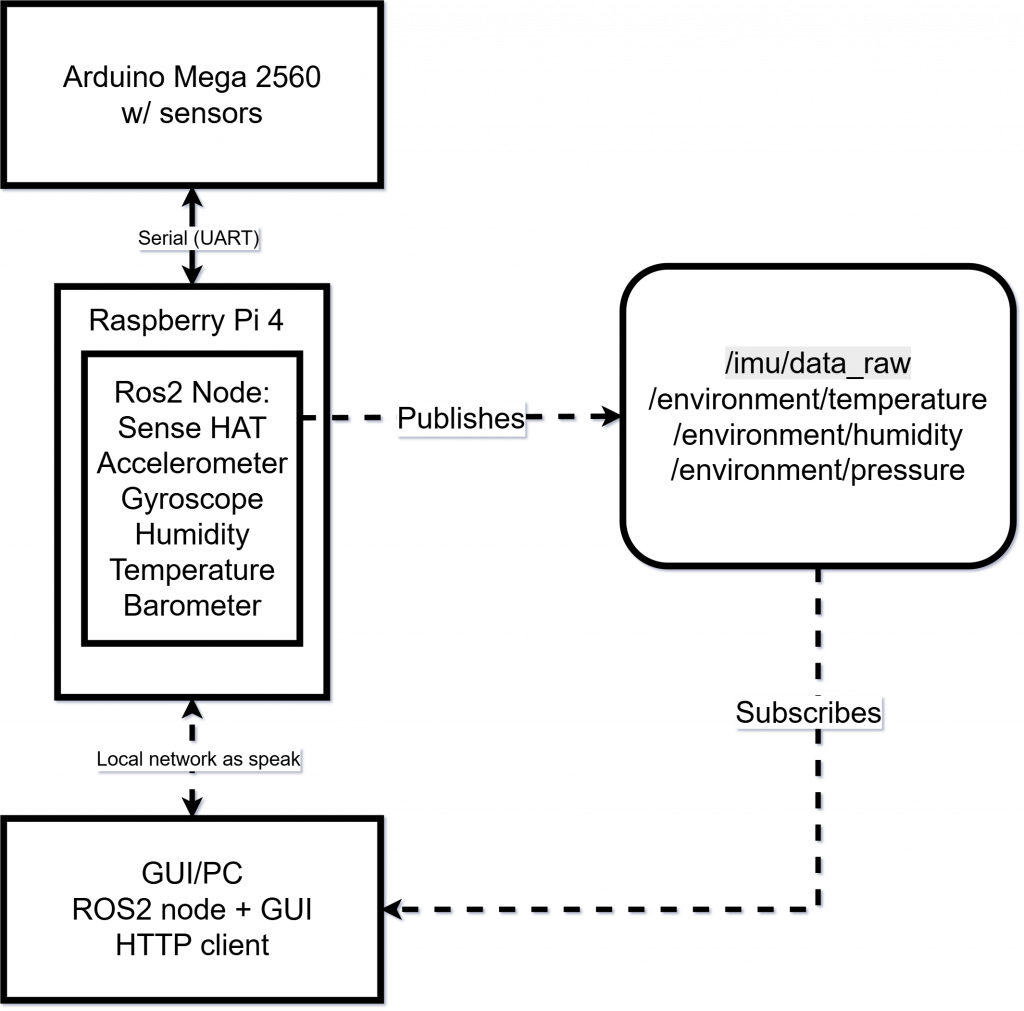
System Architecture Scoped Down
This is a scoped down diagram of what I hopefully will finish by this sprint. This is how I think this is, and how it will be, at lest for this iteration.
Get readings in Terminal from Sense HAT
This was a bit tricky. I had to find out what sensors and buttons on the Sense HAT that work with the Ubuntu-22.04 distribution. The buttosn and joysticks is not supported. Luckily, that aint an issue. All the sensors are fully supported. It is python3-sensehat package that does not support Ubuntu-22.04 fully. I had to go in to the library and set the joystick to None. After that, we did have som sensor readings. Frickin love it.
Making the Sense HAT a Ros2 Node
To get readings from the Sense HAT, I had to implement it as a Ros2 Node. This node is named sensehat_node. To create the node I used Python, and Ros2-library rclp for communication between nodes.
The class SenseHATPublisher heritates from rclpy.node.Node and works as a independent process in the Ros2 system. When starting, a publisher is created. This publish messages on a topic. It uses std_msgs/msg/String where the data is sent as a JSON-string with the different readings.
The sense HAT module is read via the library sense_hat, as mentioned before. The node publishes every second, and the requirement is fullfilled.
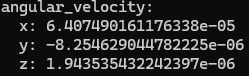
I also get readings from the other sensor.
List after finnishing this iteration
Again, thanks to the genius himself, Sander Pedersen, no task will ever be forgotten. This is great for structuring a single task. Everything is quality approved. Mate på for more fun. The Sense HAT now works as a Ros2 Node, publishing data in real-time.
Show GUI readings from Sense HAT
Check list – GUI Iteration 36

I now want to make the Sense HAT readings being displayed in the GUI. I will continue on with the iterations on the GUI. The GUI starts to be very complex It changes every week, and our systems is getting more and more complex as well. In this iteration, I will first of all display the readings. And I want to make a whole sensor reading page. If I have time, I will do one more thing this sprint, and that is to clean the GUI. This will have its own paragraph, if I can find the time.
Designing the GUI
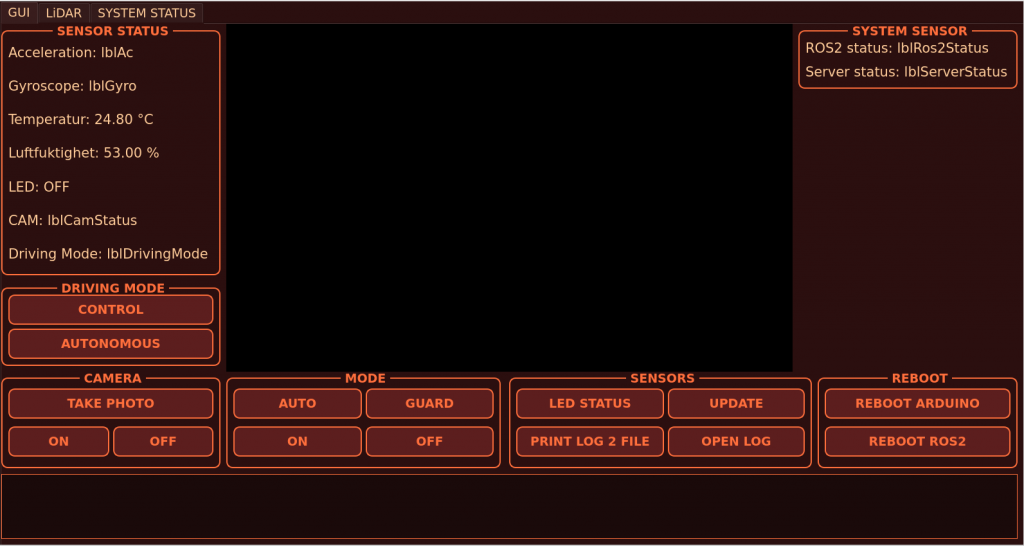
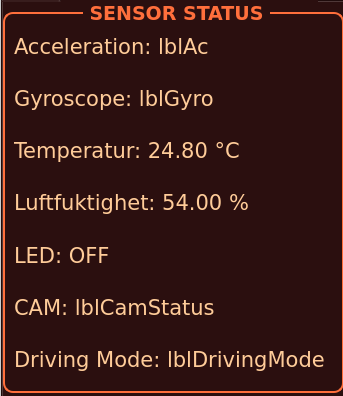
The acceleration and gyroscopic labels are ready. The problem however is that I cant get redings between the RaspberryPi and the WSL terminal. The problem is that WSL is running NAT-type. Because of this, I cant get communication between the RPi4 and the WSL virtual room. The solution will be to download Ubuntu os dekstop for my computer. I tried, oh how i tried. I spent a lot of time troubleshooting this. Way too much. This was the end of it, the end of this iteration. Im out of time. The posotive is that everything is ready for next week!
Checkbox – End of this Iteration
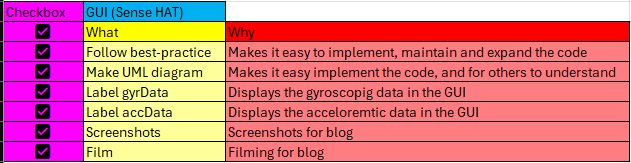
End of iteration. Its not completely done. I checked some boxes that I shouldnt checked. The problem, is that WSL vesion 2 runs with nat. . Because of this there is no communication locally. The solution will be to download Ubuntu os dekstop for my computer. The GUI is now ready. All in all a great week.
Next week:
The number one priority will be to continue on the work to have an fully autonomous car. The Sense HAT is now a Ros2 Node, and we are ready.
Will try to remove my screen from the laptop, and use the terminal without the ability to use the screen. I will also smash my mousepad, and only use keyoard. I want to go full top less in the terminal.
I tried this prompt in the terminal:
sudo apt updt dtbs curl -m "make car design in hardware, and connect all the sensors to the car" reabase origin git stash pop
Nothing happend. The car did not get a chassie. I still believe this will be possible some day, but I cant spend too much time on fixing that promt at the moment. I will have to breath curl commands first. We must talk to Richard, and ask him if he can help us with our design, and vision. He has said yes, long ago, the ball is still on our court. We will get to it next week. It is muy importante to say the least. Highly prioritized quest.
We also have som problems regarding the electricity for our car. We will speak to Steven about this.
We will have a group meeting. Set up a new backlog and continue to mate på.
Sander:
This week I did some testing to see if I could get the rover to drive wirelessly using two power banks. The Raspberry Pi 4 works great with the power bank, but the motor driver card did not work as I hoped. This is due to the starting power draw of the 4 motors being too high for the power bank to handle, this was what I feared, but I had to try it. I tried some workarounds like starting the motors one at a time, but this did not work either. I tried different delays on the motors and different starting speeds, but nothing worked. I also had a problem with the power banks turning off due to low power draw when idle, I tried to fix this by sending a PWM signal that pulses one wheel every 5 seconds. Spent a bit too much time trying to get this to work.
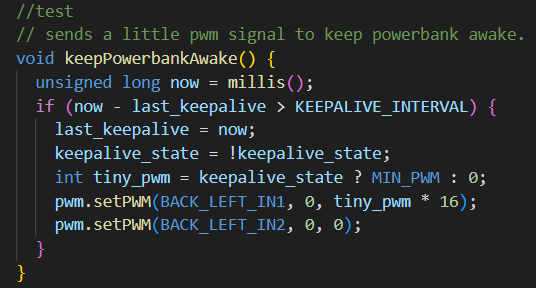
This is the code that i tried to keep the power bank from turning off.
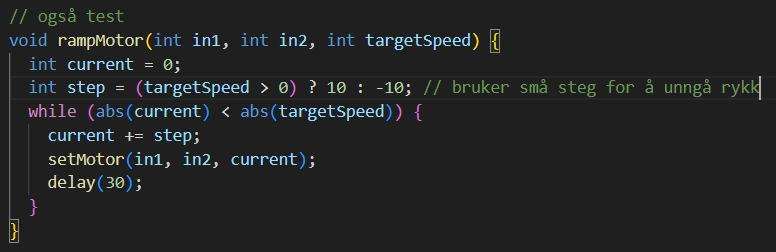
This is the code i tried to make the motors ramp up individually, but this didn’t work.
Now the next step is to get a battery pack made for this. In the meantime, I will just use a 3-meter cable for the RPi4 and use the Pi to provide power to the motor board as seen in the picture below. The reason i wanted the power banks to work was that it would make testing the lidar much simpler without having the cable hanging from the car.
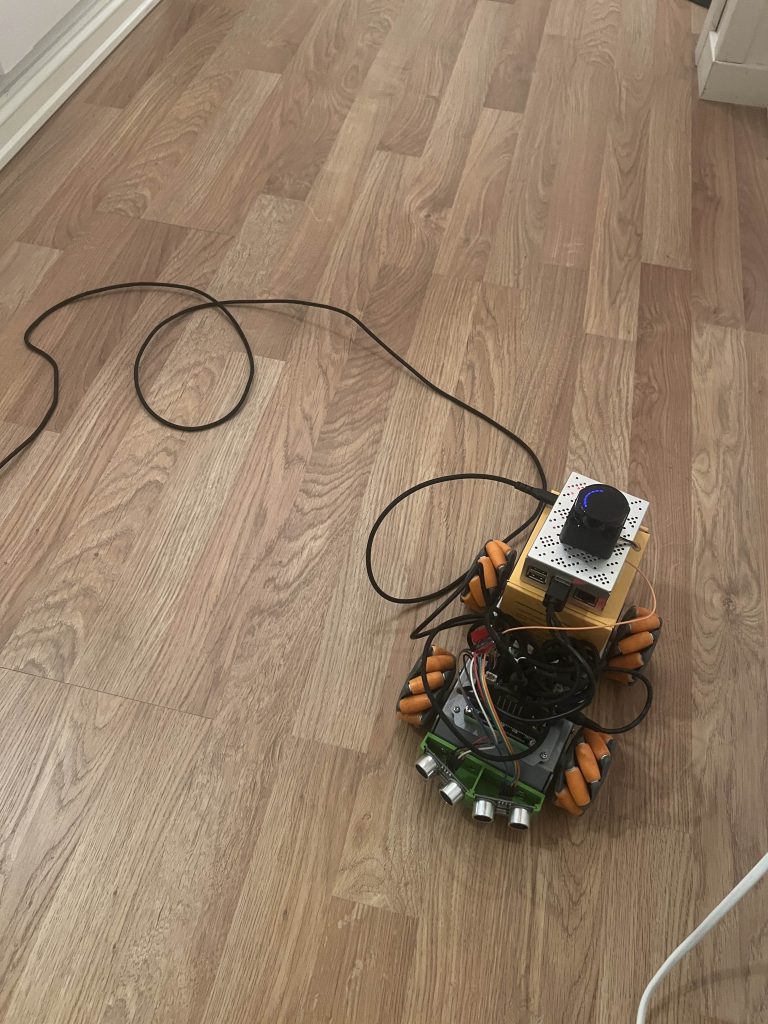
This is the demo setup i have been running while getting the lidar to work and testing this on a moving car. Next week will be fully dedicated to getting the car autonomous, the plan is to use the lidar for path planning and mapping, while the ultrasonic code that August got working this week will function as a fail-safe, and will block the car from being able to crash into a object.
I also suddenly had some difficulties getting the joystick to work again this week and spent some time debugging this because the teleop_twist_joy node doesn’t work as it should on my new computer. This ended in me cleaning up the workspace as there were a lot of junk files after building and testing the code, I also created a “tasks.JSON” file to run tasks faster in vscode. I also improved the development setup I had with the RP4 now instead of having to use ssh on the pi and write code in the terminal I can write code directly from VSCode using the Remote SSH extension, this means i can open the remote workspace on my PC in VSCode which makes it much easier to keep it organized. this helped making my workflow more efficient.
The backlog was also updated this week and we did a bit of brainstorming
Lidar
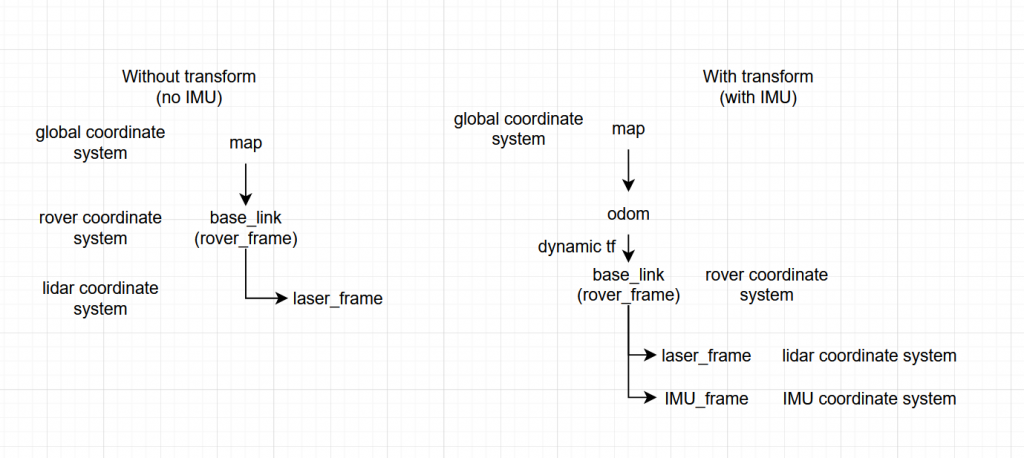
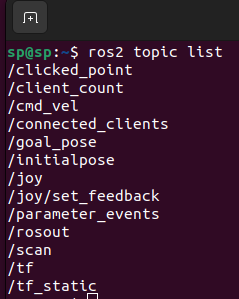
The lidar is mounted on the car and is publishing to the raspberry pi, that im connected to with ssh from my computer over wifi, the plan is that the pi will be a wifi-hotspot for us to connect to, this is not optimal but is easier when testing on the school. The next step for mapping and processing of this data is to use the data from the sense-hat that August have worked on to create a dynamic transform for the laser_scan, this is so that the map is static but the rover is moving, now the whole scan is rotating with the car. I will do more research on this the upcoming week. We will also have to look into ways to mitigate IMU drift.
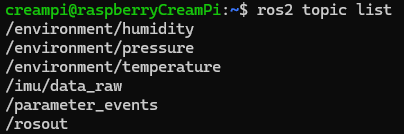
Here we can see that all the topics is visible from the computer using ROS2 DDS.
Next week:
- Research lidar data processing/SLAM (slam_toolbox)
- Look into IMU drift
- Transforms in ROS2
- Navigating using lidar data
I might try to use the lidar without a transform first to test collision avoidance for a “dumb” autonomous driving, and then try using a transform with the IMU to have the obstacles be mapped and remembered for path planning.
Oliver
This week, I was unfortunately unable to work due to health-related reasons. However, I did look into and order a replacement belt for the LiDAR, and I am now waiting for it to arrive.