Meron:
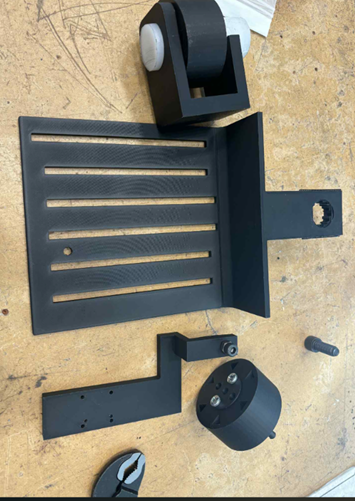
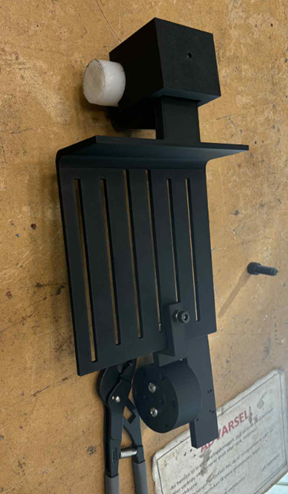
This week I received the 3 D printed parts that I designed earlier in SolidWorks. I have now started the process of assembling the components physically in the workshop. The work has included preparing the chassis and wheels parts as well as beginning the mounting process. In addition, I have made adjustments by adding necessary materials from the workshop and carrying out tasks such as drilling holes to ensure proper fitting and alignments. These steps are essential for moving from the digital model to a functional physical prototype which will later be ready for integration with the electronic systems developed by the data engineering team.
Salim:
I was tasked to work on the connection for the controlsystem for the motorcycle movment. I decided to use the micro:bit mobile app and bluetooth to send control signal wirelessly. I connected the micro:bit to pc with USB. Then, using MakeCode Python, I created a program that displays F on the micro:bit when the motorcycle moves forward, triggered by pressing button A on the moblie app. When button B is pressed, the motorcycle moves backward and B is shown on the display. This solution removes the need for manual activation.
I also imported the Bluetooth library to enable wireless communication. Here is a simple code i used:
import bluetooth

#Start Bluetooth connection
bluetooth.startUartService()

#Reads data
def message_received():
    msg = bluetooth.uartReadUntil("\\n")
    if not msg:
        return

    if msg == "A":
        basic.show_letter("F")
        bluetooth.uartWriteString("FORWARDS")
    elif msg == "B":
        basic.show_letter("B")
        bluetooth.uartWriteString("BACKWARDS")
    else:
        basic.show_letter("S")
        bluetooth.uartWriteString("STOP")

bluetooth.onUartDataReceived(serial.delimiters(Delimiters.NewLine), message_received)

#Show that micro bit is ready
basic.show_letter("READY")
This code looks for messages sent from the phone. We experienced issues with the Bluetooth connection. There were too many verification steps required before data packets could be transmitted, which caused the system to only work manually and not via Bluetooth. We will investigate a better and more reliable solution next week.
Mohammed A:
I have 3D moduled bike for fase 1 as a backup, and ready to print if anything goes wrong if the original has any problem. The idea of design like lego so that it can be easly build, part change, or additional build. “The picture is on the way” I have written new requrements for the fase 2 that have been mention in the beginning of the report.
Muhammed Ø:
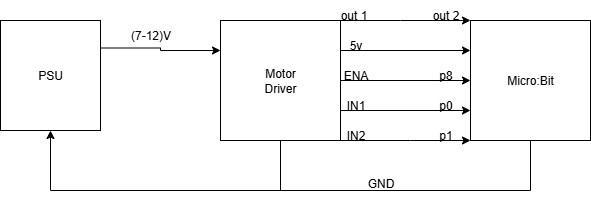
This week i worked on the assembly of the electronic components in the system and a simple code to rotate the motor in both directions using the buttons on the Micro bit microcontroller, this was done to ensure that the system was assembled correctly and to check if all the components are working, which they were. The code was written in MakeCode Python, the way the code works is that it turns on enabe A which is a pin on the motor driver card that enabels for the motor to spin. the pin is also used to choose the speed at which the motor spins at
The code that i made is a simple code that does not choose the speed of the motors just verifies that the connection is right and all of the electronic componets works as they should.
this is the code:
from microbit import *
import utime

IN1 = pin0
IN2 = pin1
ENA = pin8

def motor_forward():
    ENA.write_digital(1)   # slå på enable
    IN1.write_digital(1)
    IN2.write_digital(0)

def motor_backward():
    ENA.write_digital(1)
    IN1.write_digital(0)
    IN2.write_digital(1)

def motor_stop():
    ENA.write_digital(0)
    IN1.write_digital(0)
    IN2.write_digital(0)

while True:
    if button_a.is_pressed():
        motor_forward()
        display.show("F")
    elif button_b.is_pressed():
        motor_backward()
        display.show("B")
    else:
        motor_stop()
        display.show("-")
    utime.sleep(0.1)
this is the wiring diagram for the MVP
i forgot to take pictures of the finished circut but i have taken a video of the finished circuit in working condition: