AUGUST:
NightVision Camera:
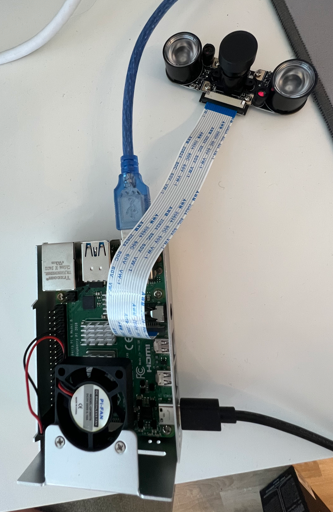
Over the past week, I spent way to many hours trying to get a Raspberry Pi 4 running Ubuntu-22.04 to successfully capture an image with a ZeroCam NoIR with IR – Camera Module. The process turned out to be far more challenging than expected, and I went through several iterations before finding a working solution.
At first, I attempted to integrate the camera as a ROS2 node using ninja and colcon, but quickly realized it was not a viable path for this setup. I tried several times, spending multiple hours just waiting for the colcon to build the ros2 work space. The breakthrough came when I installed raspi-config by running sudo apt install raspi-config, launched the Raspberry Pi configuration GUI by running sudo rasp-connfig, and explicitly enabled the camera module interface. This was really a nightmare, but a great feeling figuring it out.
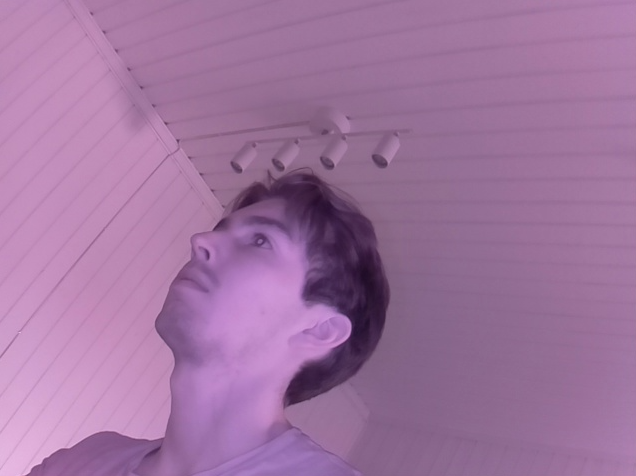
Once the camera was recognized by the system, I switched to OpenCV (cv2) for image capture and streaming. With that, I was finally able to capture images directly from the Pi. First picture, what a relief:
Flask server:
This week, I expanded the system’s API to include several new routes that provide direct control over the camera module and allow external clients to monitor its status and stream live video. These additions make the system more modular, accessible, and easier to integrate with the GUI and other components.
/api/camera/on: Activates the camera and updates its status.
/api/camera/off : Deactivates the camera and releases resources.
/api/camera/: Returns the current status of the camera (active/inactive).
/api/camera/capture: Captures an image and stores it in the predefined directory.
/video_feed : Streams live video from the camera, which is embedded into the GUI or accessed via browser
/api/history: by using a client and type rpi4 ip-address and port/api/history you can see the blockchain.
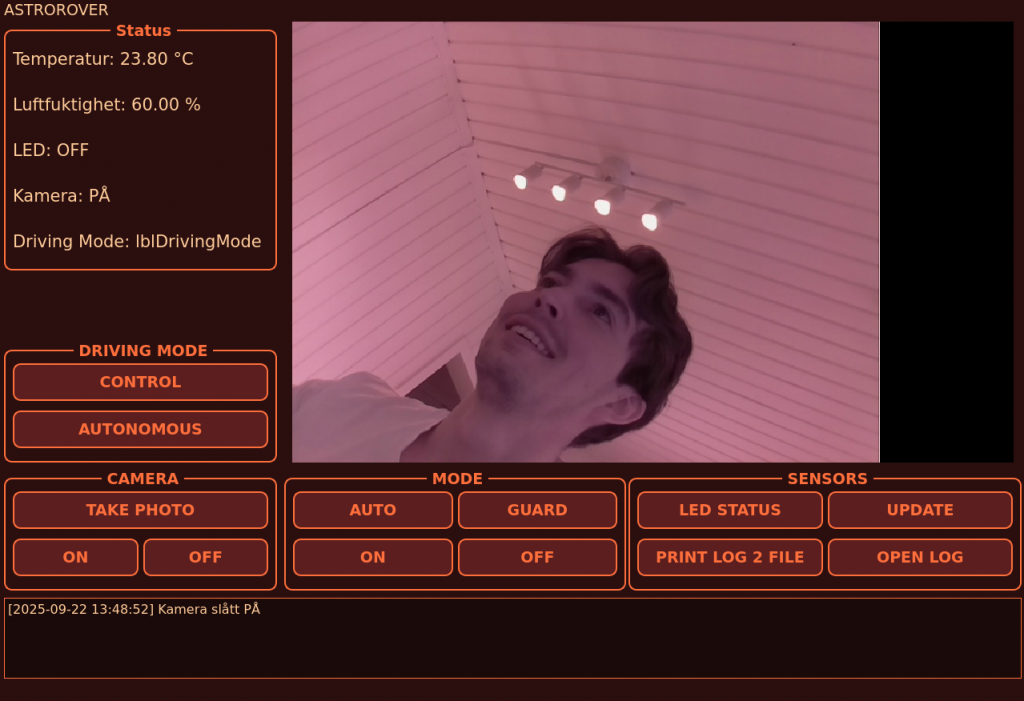
GUI:
Thanks to the camera i could extend the GUI with implementing a video feed to the video feed placeholder. The GUI application is running on my PC, which connects to teh Pi over ssh. The arduino is connected to the Pi by USB. The GUI has been expanded to support several new features:
- Image capture: the user can trigger the camera from the GUI, and the images are automatically stored in a predefined path with catalog.
- Camera control: the GUI provides buttons to turn the camera on and off, updating status display accordingly
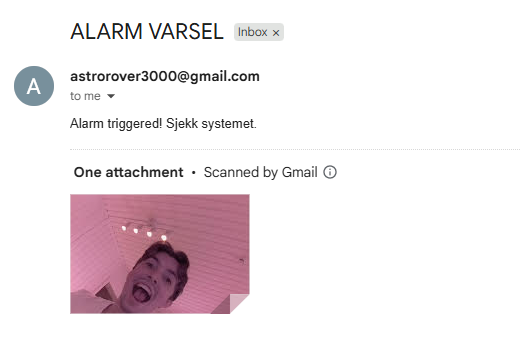
- Alarm integration: if the alarm system is triggered, an email notification is sent along with a newly captured image of the intruder as an attachment.
- Future extensions: the GUI has placeholders prepared for car control and autonomous driving status. Lets the user chose controlling the car with a joystick, or let the car drive atonmous. Also a lbl for showing the current driving status.
I also tried to implement a flash every time the user captures a image, but the GUI always crashed after capturing with flash. I decided to drop the flash, and instead print out in the termial of the GUI that the picture has been capture. By doing this, the GUI dont crash, but the GUI still lets the user know that the GUI has taken an image an akcknowledges this.
Blockchain:
To make the alarm system credible and secure I implemented a blockchain. This allows the system to store each alarm event in an immutable chain, making it possible to verify the authenticity of captured images and sensor data over time. Each block contains a timestamp, the system mode ALARM, temperature and humidity readings, PIR sensor status, and a SHA256 hash of the captured image.
The blockchain is implemented using a custom Python module with two core classes: Block and Blockchain. The Block class defines the structure of each block, including its index, timestamp, data payload, previous hash, and its own hash. The Blockchain class manages the chain, starting with a genesis block and appending new blocks as events occur.
When an alarm is triggered, the system captures an image, calculates its hash using Python’s hashlib library, and packages the relevant sensor data into a dictionary. This dictionary is then passed to the add_block() function, which creates a new block and appends it to the chain. The entire chain is serialized and saved to a chain.json file for persistence and future verification.
Arduino and sensorsystem:
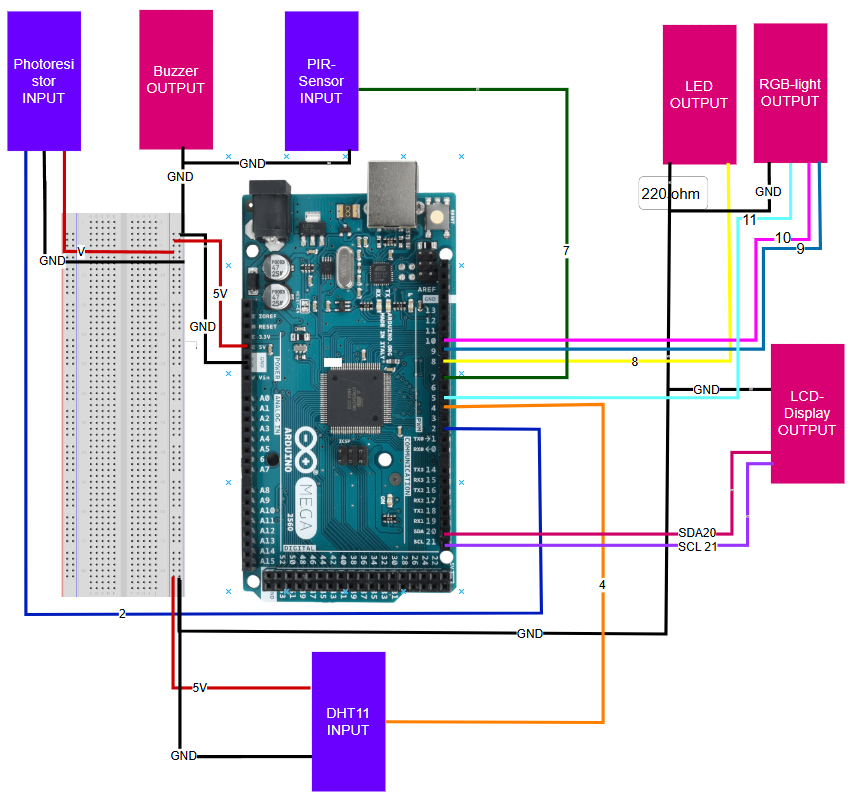
I have created a wiring diagram for the Arduino, so it will be easy to implement the hardware of the sensorsystem to the car. I have iterated the sensorcode in c++, and i have cleaned the code. It now follows best-practice to the max. The sensorsystem works as intended.
Plan for further development
Overall, the system is now much more robust and modular. The Raspberry Pi handles the camera feed and alarm logic, while the GUI offers intuitive controls and feedback. With OOP-compliant Arduino code and a scalable GUI, the platform is ready for the next stage: integrating autonomous driving and controller-based controlling.
Sander
This week I started exploring how to make the rover move autonomously, without direct joystick input. The idea was to use the Lidar sensor to detect obstacles and then let a new ROS 2 “automove” node make decisions about movement. Since the Lidar we got is not working, I had to do a bit of high-level planning of the logic behind the autoMove node, without having hands-on with the hardware. The lidar we have is missing the band to spin the sensor. If we can’t fix this during the next few days, we will order a new lidar specifically made for ros2 and the PI, as this is an important component for the further development of the rover’s core capabilities.
LIDAR as Input
The LIDAR provides a 360° view around the rover in 2D, publishing data on the /scan topic as a sensor_msgs/LaserScan. Each message contains hundreds of distance points, which essentially give the robot a “radar-like” perception of its surroundings. This can be visualized in Rviz when we get the lidar and later display the point cloud in the GUI.
Autopilot Node Concept
I designed the architecture for an autopilot node that subscribes to /scan, processes the data, and decides on safe motion commands. At a high level, the logic works like this:
Split the Lidar data into sectors, simplifying the decision-making process in the autoMove node. The ultrasonic sensor can also be used for a safety measure for detecting obstacles that the lidar might not detect, placed in front of the rover the code can be run directly on the microBit which handles the motor control, this can ensure that the presence of a object in front of the rover will stop if from moving forward separate from the commands comming from the PI.
Check for the minimum distance in each sector.
If the front is clear ->move forward.
If the front is blocked-> turn towards the side with more space.
If all sides are blocked -> stop.
The node would then publish its decisions as geometry_msgs/Twist on /cmd_vel, in the same way the joystick teleop node does.
Integration with Existing Pipeline
This approach fits neatly into the current setup:
Joystick (teleop_twist_joy) and autopilot both publish to /cmd_vel.
The rover’s motor driver node listens to /cmd_vel and forwards commands to the micro:bit motor controller.
One of the plans is to have a button on the joystick as a toggle between the autonomous and manual mode, also displayed in the GUI.
Next Steps
Hands-on testing with the lidar.
Implement and test the autopilot node in ROS 2 with real LiDAR data.
Tune the sector definitions and thresholds for smoother decision making.
Experiment with scaling speed based on distance to obstacles.
This week was about laying the foundation for autonomy. While the rover can already be teleoperated smoothly, the next phase will let it navigate and avoid obstacles on its own using Lidar. This is the main goal we need to be working on for next week together with the presentations.
Sondre
This week I started researching alternative cameras after running into several issues trying to get the Pi Camera Module working on Ubuntu. I found a promising USB camera and decided to order it. The main reason I switched from CSI to USB was the simplicity of plug-and-play, which allows me to focus on integrating the camera with the ROS environment and setting up a camera node.
After a few days of waiting, the camera finally arrived. I started experimenting with it but initially ran into several issues, the Raspberry Pi and my laptop couldn’t see each other’s topics in ROS 2, which meant the camera feed wasn’t showing up. After some hours of trying and failing, I tried switching from CycloneDDS to Fast DDS. Finally the two devices started sharing topics and the camera feed published successfully. From there, I could stream video from the Raspberry Pi and view it on my laptop as a listener.
In addition, I spent some time learning more about RViz and plan to test it further to visualize the camera data.
The next step is to start working with OpenCV for video processing. My goal for next week is to have both a camera node and an image processing node up and running.
oliver
I have unfortunately been unable to work during this period due to health-related reasons